
January 30, 2026
How to Create a Step-by-Step Guide People Actually Use

Tired of unused SOPs? Learn how to create a step-by-step guide your team will follow. This guide covers planning, AI-powered recording, editing, and sharing.
Before you even think about hitting record, let’s talk about the one thing that makes or breaks a guide: the plan.
A great guide isn't just a list of clicks. It's a solution built for a specific person trying to solve a specific problem. Rushing this stage is like building a house without a blueprint—it might look okay at first, but it’s guaranteed to fall apart when someone actually tries to use it.
The real purpose of your guide dictates every single decision you make, from the words you choose to the level of detail you include. Getting this right is so important that the entire market for SOP software is booming. It was valued at USD 1.2 billion in 2023 and is expected to more than double to USD 2.7 billion by 2032. As DataIntelo reports, that growth shows just how critical well-planned digital instructions have become for businesses everywhere.
Plan Your Guide for Real-World Impact
Let's build a foundation that ensures your guide solves a real problem, not just documents a process.
Define Your Guide's Core Objective
First things first: what is the point? Pinpoint the single, specific outcome your guide needs to produce. If you can’t state the goal in one sentence, your guide will feel unfocused and confusing.
Think about the primary job of the guide. Are you trying to:
Onboard a new hire? The real goal is to get them productive on a core task with less hand-holding.
Train a client on new software? The objective is to boost product adoption and cut down on support tickets.
Document an internal process? The aim is to create a single source of truth that keeps everyone consistent.
Each of these scenarios demands a different approach. An onboarding guide for a new teammate probably needs more context and "why" explanations. A client-facing guide, on the other hand, should be hyper-focused on getting them to their desired outcome as quickly as possible.
A guide without a clear objective is just a collection of steps. A guide with a purpose is a tool that moves someone from a state of confusion to a state of confidence.
Map the User's Journey
Once you know the why, you have to figure out the who. Seriously, put yourself in their shoes. What do they already know? What are their biggest frustrations or fears about this process?
If you can anticipate their questions, you can build a guide that feels like it’s reading their mind.
Imagine you're creating a guide for submitting a monthly expense report. A brand-new employee is probably wondering, "Where do I even find this portal?" or "What's the difference between a 'category' and a 'tag'?" Meanwhile, a veteran employee learning a new system might just want to know, "How is this different from the old software?"
Mapping their journey helps you spot these roadblocks before they happen. This isn’t about creating a rigid, step-by-step prison, but about building a flexible path that addresses common points of confusion.
To really drive this home, think about how you're structuring your plan. Are you just listing tasks, or are you thinking about the user's experience?
Guide Planning Framework Template vs Traditional Outline
This table shows the difference between just listing steps and truly planning for your audience.
Planning Element | Traditional Outline Approach | Modern Framework Approach |
|---|---|---|
Starting Point | What are the tasks? | Who is this for and what problem do they have? |
Focus | Process-centric | Audience-centric |
Structure | A linear list of all steps. | Logical "chunks" based on user goals. |
Key Questions | "What does the user need to do?" | "What does the user need to know, see, and feel?" |
Pain Points | Ignored or treated as edge cases. | Anticipated and addressed directly in the guide. |
Outcome | A complete, but often rigid and dense document. | An intuitive, usable guide that solves a real-world problem. |
The takeaway is simple: a modern framework forces you to think like the end-user, which is the secret to creating a guide people will actually be grateful for.
Break Down Complex Workflows
Nothing kills learning faster than overwhelm. A single, 50-step process is intimidating and practically guarantees someone will give up halfway through.
The fix is simple: break it down into logical, digestible segments or "chunks."
Think of them as chapters in a book. Each chunk should cover one major part of the overall task. For that expense report example, your segments might look something like this:
Logging In and Finding Your Dashboard
Creating a New Expense Report
Adding and Categorizing Your Receipts
Submitting for Approval
This structure makes the whole process feel more manageable. It also lets people jump directly to the section they need help with, respecting their time and mental energy. When a guide is easy to navigate, people are far more likely to see it through to the end.
Capture Your Workflow with AI Assistance
With a solid plan in your back pocket, it’s time to let the tech do the heavy lifting.
The old way of making a step-by-step guide was a soul-crushing cycle of clunky screen recorders, snapping dozens of manual screenshots, and then painstakingly marking up every single one. Modern tools flip this script entirely, turning a multi-hour chore into a simple recording session that spits out a powerful first draft in minutes.
The goal here isn't perfection. Not even close. It's about capturing the raw process as it happens and letting the AI handle about 80% of the grunt work. This frees you up to focus on the truly human part: adding your expertise, crucial context, and the "why" behind each click.
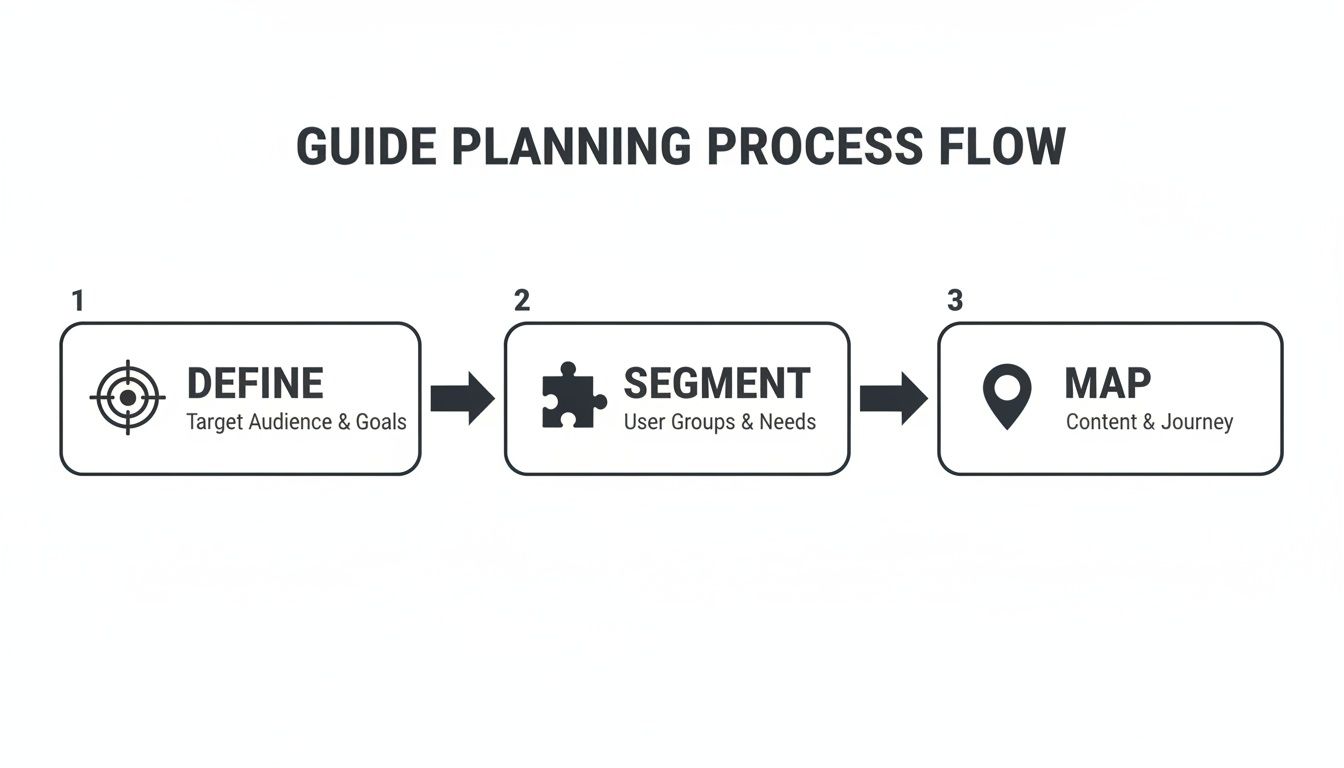
This Define, Segment, and Map flow is what ensures your recording is focused and useful before you even hit the record button.
Set the Stage for a Clean Recording
Before you start, a little prep work goes a very long way. A clean, distraction-free recording makes the AI's job much easier and produces a far more professional guide. Think of it like clearing your desk before a big project—it prevents clutter and confusion down the road.
Here are a few quick things I always do before capturing a process:
Close unrelated tabs and apps. Nobody needs to see your Slack notifications or the ten other projects you’re juggling. Shut down everything that isn't essential for the task at hand.
Use a clean browser profile. Log into a guest or new profile. This simple trick hides all your personal bookmarks, extensions, and saved logins, keeping the focus entirely on the workflow.
Zoom in for clarity. I usually bump my browser zoom to 110% or 125%. It makes on-screen text and buttons bigger and much easier for people to read in the final screenshots.
These few minutes are a tiny investment that pays off big time in the final quality of your guide.
Narrate Your Actions for Richer Context
As you record, get into the habit of talking through what you’re doing. Speak clearly and explain not just what you're clicking, but why you're clicking it. This is where the magic happens, giving the AI invaluable context to generate much better, more helpful instructions.
For instance, instead of just silently clicking a button, say something like, "Okay, now I'm going to click 'Advanced Settings' because that's where we need to configure the user permissions." That simple voice-over adds a layer of intent that a silent recording completely misses. The best tools can transcribe this and pair it with the right visual step, which we cover in more detail here: https://buildaguide.app/blogs/f/record-once-guide-forever-a-better-way-to-document/.
The real power in this approach is that the AI doesn't just see your clicks; it hears your intent. It transforms a basic screen recording into a structured, editable document that's already halfway to being a finished guide.
Let AI Automate the Documentation
Once you stop the recording, the real efficiency kicks in. Instead of you having to rewatch the video, snip out screenshots, and type out every step, the platform does it all for you. This is the entire point of using a tool like Build a Guide.
The AI gets to work and automatically handles the most tedious tasks:
It generates written instructions for every action you took on screen.
It captures and crops screenshots for each step, focusing only on the relevant area.
It structures everything into a logical, step-by-step guide format.
What you get back is a fully-formed, editable first draft. The screenshots are in place, the text is written, and the entire flow is mapped out. To make those visuals even more effective, mastering the art of annotation is key; achieving screen capture annotation mastery can take your guides to the next level.
This automation collapses hours of mind-numbing work into just a few minutes, letting you jump straight to the refinement stage where your human insight adds the most value.
Refine Your Guide with Human Expertise
An AI-generated draft is an incredible head start. It gets you about 80% of the way there, which is amazing. But that last 20%? That’s where you come in. This is where your expertise turns a functional set of steps into a guide that actually helps people.
This part isn't just about fixing typos. It’s about adding your voice, providing critical context, and making sure the information is genuinely clear. Let’s walk through how to take that solid AI draft and make it truly excellent.
Fine-Tune the Language and Tone
Your first editing pass should be all about the words. AI is great at describing what happened on screen, but it has no idea what your company actually sounds like or what language your audience uses.
As you go through each step in the rich-text editor, ask yourself a few questions:
Does this sound like a real person from our team? Swap out stiff, corporate phrases for the words your team actually uses. If you say "hit save," your guide should say that, not "execute the save command."
Could this be any simpler? Cut extra words and simplify complex sentences. You're aiming for direct instructions that leave zero room for confusion.
Is anything ambiguous? Hunt for acronyms or internal jargon that a new person might not know. Define them the first time they appear.
A guide that speaks your audience's language builds trust and makes the whole process feel less like a chore.
Add Context the AI Cannot See
A screen recording shows the what, but it can't explain the why. This is where your insight is irreplaceable. Adding this context is what separates a basic checklist from a powerful training tool.
For instance, the AI might generate a step like, "Click the 'Enable Legacy Mode' checkbox." It’s technically correct, but it leaves the user wondering why they're doing it.
A great guide doesn't just show the path; it explains the terrain. Adding the 'why' behind a step gives users the confidence to troubleshoot and adapt the process to their own needs.
You can add this context by simply enriching the text. Explain the reason behind a choice, warn about a common mistake, or clarify what to expect after a certain action. Your goal is to answer the questions that will pop into a user's head as they follow along.
Here’s how to inject that value:
Explain the "Why": Add a note like, "We're enabling legacy mode because our old reporting software isn't compatible with the new interface yet. Disabling it can cause data sync errors."
Warn About Pitfalls: Insert a callout that says, "Warning: Do not proceed without saving. Any unsaved changes in this section will be lost permanently."
Set Clear Expectations: Clarify what happens next. For example, "After you click 'Submit,' the system will take about two minutes to process. Don't close the window."
This level of detail is the difference between a user just following orders and truly understanding the workflow.
Enrich Your Guide with Visual Elements
While the AI handles the basic screenshots, you can dramatically improve the guide by adding richer media and better formatting. Visuals break up walls of text and draw attention to what really matters.
Think beyond plain paragraphs. Use checklists for steps that have multiple small actions, or embed a short video to show a tricky maneuver that’s tough to explain with static images.
Consider adding these powerful enhancements:
Use Callouts for Emphasis: Highlight important tips or warnings with visually distinct callout boxes. This immediately draws the reader’s eye to critical info they can't afford to miss.
Create Checklists for Complex Steps: If a single step involves several smaller tasks (like "Configure your profile"), break it into a checklist. It makes the step feel less intimidating and gives users a sense of progress.
Embed Supplemental Videos: For a truly tricky part of the process, a short, silent screen recording showing the mouse movement can be a lifesaver. You don't need a full production—just a quick clip.
Investing time in these refinements has a real-world impact. Take XYZ Manufacturing Inc., where rolling out detailed, step-by-step documents transformed their operations. They saw defect rates plunge from 15% to just 5% and on-time delivery jump from 73% to 91%. It’s a powerful reminder of what clear guidance can do. You can explore more about the market impact of SOPs on DataIntelo.com. By spending this time on refinement, you're not just making a document; you're creating an asset that drives consistency and success.
Build a Collaborative Process Library
A truly effective step-by-step guide is never really "done." It’s a living document that needs to adapt as your processes, tools, and team change. The goal isn't just to create a static file, but to build a dynamic, team-owned asset that stops knowledge from becoming outdated the moment it's published.
This is where you shift from just documenting to actual collaboration. When you first create a step-by-step guide, you’re just capturing a process at a single point in time. By inviting your team into the creation and maintenance process, you make sure that guide stays accurate, comprehensive, and trusted for the long haul.
This change in mindset is about moving away from "tribal knowledge"—that critical information trapped in one person's head—and toward a centralized, reliable library of SOPs that everyone can count on.
Invite Teammates to Co-Create and Edit
The fastest way to improve a guide is to get more eyes on it, especially from the people who will actually use it every day. When you invite teammates to co-edit in real-time, you tap into their unique expertise and on-the-ground perspective.
They’ll instantly spot steps you may have missed, clarify confusing language, or add a crucial warning about a common pitfall you completely overlooked. This collaborative approach turns a guide from a top-down directive into a shared resource that everyone feels some ownership over.
For example, a new hire looking at an onboarding guide might add a comment like, "This step was a bit confusing; I wasn't sure which button to click until I tried it twice." That's pure gold—invaluable feedback you can use to make the guide better for the next person.
Use Contextual Comments to Streamline Feedback
Email chains and scattered Slack messages are where good feedback goes to die. To make collaboration actually work, use tools that allow for contextual comments directly within the guide. This lets team members highlight a specific sentence, screenshot, or step and leave a targeted note right where it belongs.
This method keeps all the feedback organized and tied to the exact part of the guide it refers to. No more guesswork.
For Clarification: A teammate can highlight a step and ask, "Does this apply to international clients as well?"
For Updates: A developer might comment on a screenshot, "This UI is changing next week; we'll need to update this image."
For Suggestions: A support agent could add, "It might be helpful to link to the troubleshooting article here."
This approach cuts out the ambiguity and makes it simple for the guide's owner to review and implement changes without needing yet another meeting.
By decentralizing the feedback process, you empower every team member to contribute. This not only improves your documentation but also fosters a culture of shared responsibility and continuous improvement.
Establish a Simple Review and Versioning Cadence
A guide without a review schedule is destined to become obsolete. To keep your process library trustworthy, you just need a simple system for keeping guides current. This doesn't have to be complicated.
Start by assigning an "owner" to each guide—the person who is ultimately responsible for its accuracy. Then, set a recurring review cadence.
High-Impact Processes: For critical workflows that change often, maybe set a quarterly or even monthly review.
Stable Processes: For foundational guides that rarely change, an annual check-in is probably enough.
When a guide gets updated, use a simple versioning note at the top, like "Last updated on [Date] by [Name] to reflect the new software interface." This small step builds immense trust. Users can instantly see that the information is current and reliable. We dive deeper into this in our article on how to keep SOPs up-to-date without another meeting.
To house and manage all of this effectively, consider implementing dedicated knowledge base software. This creates a single source of truth that's easy for everyone on the team to access and contribute to, turning your individual guides into a powerful, collective asset.
Share Your Guide for Maximum Adoption
You’ve done the hard part. You planned, captured, and refined a guide that’s clear, helpful, and accurate. But even the most brilliant guide is worthless if it just sits unseen in a folder.
The final, critical step is getting your guide into the hands of the people who need it—and in a way that encourages them to actually use it. Effective distribution is about more than just hitting "send." It’s about creating a seamless, professional experience that makes accessing knowledge easy.
Let's move beyond outdated methods like emailing clunky PDF attachments and explore how to publish your guide for real impact.
Publish to a Branded Knowledge Hub
The best way to share your guide is to publish it to a centralized, branded knowledge hub. Think of this as your team's single source of truth—a professional, organized library where every important process lives. This approach instantly elevates your documentation from a simple file to an official resource.
When you publish a guide as a clean, accessible web page, you gain a few key advantages:
Professionalism: A hub with your logo and colors reinforces your brand's credibility and makes the information feel more official and trustworthy.
Centralization: Everyone knows exactly where to go for the latest version of any process. No more hunting through emails or shared drives for the right document.
Accessibility: Guides are available on any device, anytime. No downloads or special software needed—just a simple link.
This shift toward centralized knowledge is a major trend. The Standard Operating Procedure Management market was valued at USD 1.53 billion in 2023 and is projected to hit USD 4.0 billion by 2031. A key factor in this growth is the high demand for mobile-friendly solutions, as employees expect on-the-go access to information. You can learn more about the growth of SOP management on Verified Market Research. This just underscores why modern publishing methods beat traditional, static files every time.
Ensure a Flawless Mobile Experience
Your team and clients aren't always sitting at their desks. They might need to check a process while on the go, using their phone between meetings, or from a tablet on the factory floor.
If your guide is a PDF they have to pinch and zoom to read, they simply won't use it.
Modern platforms like Build a Guide automatically format your content into a responsive web page that looks perfect on any screen. Text is readable, images are clear, and navigation is intuitive, whether on a 27-inch monitor or a 6-inch smartphone. This removes all friction and ensures your guide is truly useful where work actually happens.
Don't force your users to adapt to your document's format. Instead, choose a publishing method that adapts to your users' devices. A seamless mobile experience isn't a luxury; it's a requirement for adoption.
Leverage Analytics to Drive Improvement
How do you know if your guide is actually working? With static files, you have no idea. You send it out and just hope for the best.
Publishing your guide as a web page, however, unlocks a world of powerful engagement analytics. This data gives you direct feedback on your guide's performance, turning guesswork into a clear, data-driven improvement process.
Here are the essential metrics to watch:
Views: See how many people are actually opening the guide. Low views might signal a distribution problem—maybe the link needs to be shared more prominently.
Completion Rates: Track how many users make it all the way to the end. A significant drop-off at a certain step is a red flag that an instruction might be confusing or wrong.
Time on Page: Understand how long users are spending with the content. This can help you spot if a guide is being skimmed too quickly or if people are getting stuck.
By analyzing this data, you can pinpoint areas for improvement, refine your instructions, and create a guide that gets better over time. Check out our comprehensive post on how to create a step-by-step guide for more on the entire creation lifecycle.
This continuous feedback loop is what transforms a one-off document into a reliable, ever-improving operational asset.
Questions About Creating Step-by-Step Guides
As you start documenting processes, a few questions always seem to come up. These are the practical concerns we hear from teams all the time, especially when they're moving away from old-school documents and into a more fluid way of working.
How Long Should My Guide Be?
There's no magic number here. The right length is however long it takes to solve the user's problem—and not a single step more. A simple password reset might take three steps. A full client onboarding process could easily be twenty.
The real secret isn't about length, it's about breaking things down. Instead of one monster 50-step guide, think in smaller, logical chapters. This makes even the most complex workflows feel manageable and keeps people from getting overwhelmed.
Focus on the user's goal, not the step count. A great guide gets someone from A to B with zero confusion. That’s the only metric that matters.
How Much Detail Is Too Much?
You're aiming for that sweet spot: enough detail to prevent any confusion, but not so much that you drown the reader in text. The deciding factor is always your audience.
Think about it this way:
For a New Hire: Assume they know nothing. Spell out acronyms, explain the why behind a certain click, and never skip a step that seems "obvious" to you.
For a Seasoned Pro: You can be way more direct. Just focus on the core actions and highlight anything that's new or different about the process.
Here’s a great rule of thumb: have a teammate who has never done the task run through your draft. Every question they ask is a goldmine—it shows you exactly where you need to add more clarity.
What If Our Process Changes All the Time?
This is probably the biggest fear we see, and it's the exact reason static PDFs and Word docs are a recipe for failure. If your processes are constantly evolving, you need a living library, not a digital filing cabinet.
You should never have to start from scratch just because one step changed.
Modern tools are built for this reality. With a platform like Build a Guide, an update that used to be a major headache becomes a five-minute task. You just:
Find the outdated step in the guide.
Recapture or edit it by re-recording that tiny section or just swapping a screenshot.
Republish it. One click and the guide is live, instantly updated for everyone.
This turns documentation from a dreaded project into a quick, routine update.
How Do We Get the Team to Actually Use Them?
Adoption is everything. You can have the best guides in the world, but they’re worthless if no one uses them. The trick is to make your guides the path of least resistance.
People are busy. They'll always choose the easiest option.
So, publish everything to one central, searchable place that becomes the single source of truth. Make it faster for someone to find the guide than it is to tap a coworker on the shoulder or send a Slack message. When your documentation is reliable, up-to-date, and easier than the alternative, people will use it. It's that simple.
To help clear up any lingering questions, here's a quick rundown of the most common queries we see.
Questions About Creating Step-by-Step Guides
Question | Answer |
|---|---|
How do I pick which processes to document first? | Start with high-impact, frequently repeated tasks. Think about what questions your team asks most often or where mistakes are most common. |
What's the best way to handle different user roles? | Create a core guide for the main process, then create smaller, role-specific guides that branch off it. This avoids duplication. |
Should I use video or just screenshots? | Use both. A screen recording captures the real workflow, and auto-generated screenshots anchor each step, giving you the best of both worlds. |
How can I make sure my guides stay up-to-date? | Assign an "owner" to each process guide. Set a simple calendar reminder (e.g., quarterly) for them to quickly review and confirm it's still accurate. |
Can I use one guide for both internal teams and customers? | It's not recommended. Internal teams need efficiency and can handle jargon. Customers need clarity and a friendly tone. Tailor the guide to the audience. |
Hopefully, that gives you a clearer picture of how to approach creating guides that your team will not only use but appreciate.
Ready to stop documenting and start guiding? Build a Guide turns your screen recordings into polished, interactive SOPs that your team will actually use. Start building your process library today at buildaguide.app.