
January 28, 2026
How to Create a Step by Step Guide with Video Playbooks

Learn how to create a step by step guide using video to streamline onboarding, document processes, and build a scalable knowledge base for your team.
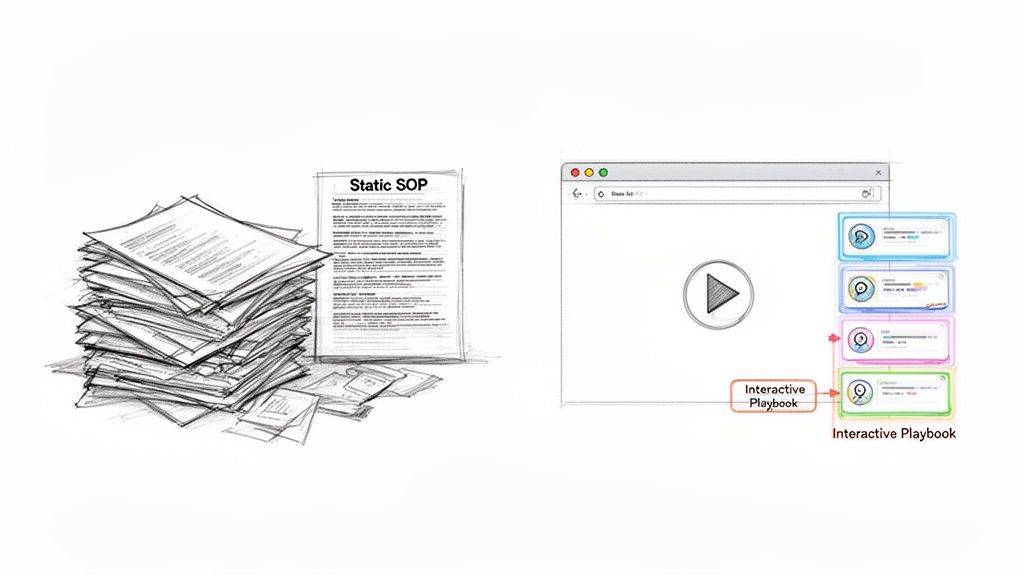
If you want to create a step-by-step guide people actually use, you have to stop thinking in terms of static documents. The real breakthrough comes when you turn a simple screen recording into an interactive, living playbook. This isn't just a format change; it automates the tedious work so you can focus on making your instructions crystal clear.
Why Your Static Guides Are Failing
Let's be honest. Most traditional guides are where good intentions go to die.
They’re usually dense, text-heavy Word docs or PDFs, buried somewhere in a shared drive, and outdated the moment they’re finished. Think about the last time you had to update one. It was probably a painful cycle of retaking dozens of screenshots, meticulously rewriting steps, and then emailing the new version around, just hoping everyone deletes the old one.
This old-school approach just doesn't work for modern teams. Here’s why:
They're impossible to maintain. A tiny software update can trigger a complete document overhaul. Maintenance becomes a soul-crushing, full-time job.
Nobody wants to read them. Walls of text and stale images are a huge turn-off. Engagement plummets, and people just stop using them.
They miss the real story. Static screenshots can't capture the flow of a process. They leave users guessing about what happens between the clicks, leading to frustration and mistakes.
A Modern Approach to Documentation
The solution is to move from static files to a living knowledge base. Instead of building guides by hand, piece by painful piece, you record your workflow once and let technology handle the rest.
This isn't just about a new format; it's a fundamentally better way to capture and share what your team knows. You can see how we think about this in our article on how to Record Once, Guide Forever.
Tools like Build a Guide are built specifically for this. A simple screen recording is automatically transformed into a step-by-step interactive guide. You get documentation that is:
Effortless to create and update. Just record your screen, and the steps, text, and screenshots are generated for you.
Genuinely engaging. With video context and clear visuals, people learn faster and retain more.
Always accurate. Updating a single step is a quick fix, not a massive project, ensuring your guide remains the single source of truth.
The difference is night and day. Let's break down the practical shift.
Traditional Guides vs Modern Video Playbooks
This table shows exactly what changes when you move from old-school methods to a video-first approach.
Attribute | Traditional Method (Text & Static Screenshots) | Modern Method (Video-to-Guide Automation) |
|---|---|---|
Creation Speed | Hours or days | Minutes |
Maintenance Effort | High; requires full rewrites | Low; edit specific steps as needed |
User Engagement | Low; often ignored | High; interactive and visual |
Context | Lacking; shows static moments | Rich; video shows the full workflow |
Scalability | Poor; difficult to manage | Excellent; easily shared and versioned |
Accuracy | Degrades quickly over time | Stays current with minimal effort |
The bottom line is simple: one method creates a chore, while the other creates a reliable asset for your team.
This shift isn't just a niche trend. The global market for standard operating procedure (SOP) management was valued at USD 124.8 billion in 2023 and is on track to hit USD 914.9 billion by 2032. That explosive growth is all about one thing: businesses are realizing that digital, automated processes are essential for staying competitive.
How to Plan and Capture Your Workflow on Video
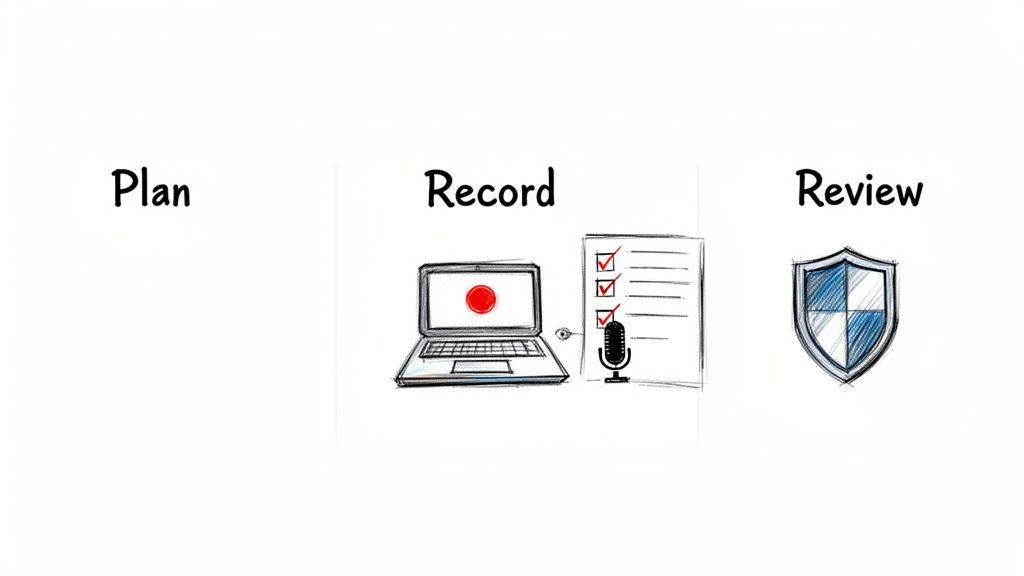
A powerful guide doesn't just happen when you hit "record." The real magic is in the prep work. It’s the secret ingredient that turns a rambling screen share into a clear, concise, and genuinely useful resource for your team.
If you skip the planning, you risk creating a video that’s confusing, too long, or misses critical steps. You end up undermining the whole point of making a guide in the first place. Think of it like a blueprint for a house—a few minutes of planning ensures your final guide is polished and easy for anyone to follow.
Start with Your Audience and Goal
Before you do anything else, ask two simple questions: Who is this for, and what do they need to achieve? The answer changes everything.
A guide for a new hire learning your CRM, for example, needs to be granular. It should cover every single click with detailed explanations. But a high-level overview for a manager? They just need to see the key reporting steps, not the basic navigation they already know.
Defining this upfront helps you filter out the noise. Your goal isn't to show off everything you know; it's to show exactly what they need to know to get the job done right.
Key Takeaway: The entire purpose of a step-by-step guide is to solve someone's problem. Always keep your end-user in mind and focus on the outcome they need.
Outline Your Key Actions
Once you know who you're talking to, sketch out a simple outline. This doesn't have to be a formal script. A quick bulleted list of the main actions you'll perform is usually more than enough to keep your recording on track.
List the milestones: What are the big stages of the process? Think: "Log in," "Navigate to Dashboard," "Create New Report," "Apply Filters," and "Export Results."
Note the tricky parts: Are there specific settings to check or common mistakes people make? Jot these down so you remember to call them out. You might note, "Remind them to select 'All Time' for the date range."
Think about what you'll say: A simple voiceover clarifying why you're clicking a certain button adds a ton of value and context.
This little bit of prep work ensures you don’t forget a crucial step halfway through, saving you from the frustration of having to re-record. For a deeper dive into producing instructional content, check out this guide on training video creation.
Choose Your Recording Method
With your plan in place, it’s time to capture the workflow. In a tool like Build a Guide, you have a couple of straightforward options.
Browser Extension: This is your go-to for capturing web-based workflows, like navigating a SaaS tool or filling out an online form. It's lightweight and captures your actions right inside the browser, making it incredibly efficient.
Uploading a Video: If your process involves desktop apps like Excel or Photoshop, or you need to jump between different programs, recording your entire screen with a tool like Loom or QuickTime is the way to go. You can then just upload the finished video file.
Honestly, for most teams, the browser extension covers 80% of use cases. It’s the fastest path from action to documentation for any process that lives on the web. We cover more on this in our guide on how to create effective training videos.
Pro Tips for a Flawless Recording
Finally, a few practical tips will really elevate the quality of your recording and make the automated conversion much smoother.
First, clean up your screen. Close all those unnecessary tabs and turn off notifications. A distraction-free screen makes a world of difference.
Next, speak clearly and at a moderate pace. Your narration provides the human context that the AI transcription builds on. Just explain what you’re doing and why, as if a colleague were sitting right next to you.
And last, don't sweat perfection. If you make a small mistake, just correct it on screen and keep going. You can easily edit or remove steps later. The real goal is to capture the process accurately, not to produce a flawless one-take wonder.
Turning Your Video into an Interactive Playbook
This is where the magic happens. Your raw screen recording, full of real clicks and cursor movements, is about to become a polished, interactive guide. Instead of spending hours manually taking screenshots and writing instructions, modern platforms like Build a Guide do the heavy lifting for you.
The tech is smarter than you might think. As it analyzes your video, it pinpoints every distinct action—a click here, typing there, a dropdown menu selection. For each one, it automatically generates a perfectly cropped screenshot, focusing the eye right where it needs to be.
At the same time, it writes out clear, simple instructions for that step. This is what lets you create a step by step guide in minutes, not hours. A team lead can record a quick three-minute walkthrough of a new feature and have a full 12-step guide ready to share before their coffee gets cold.
From Automation to Perfection
But the AI is just the starting point. The real value comes when you add your human expertise on top. The technology frees you from the tedious work, letting you step in as an editor, not a writer. Your job is to make sure the final guide is not just accurate, but perfectly clear for your team.
This is where you add the nuance the AI can't. The first draft it provides is fantastic, but your insights are what will elevate the guide from good to great. You can quickly scan the generated steps, tweak the wording, and add context that anticipates your team’s questions.
Think of it as a partnership. The AI handles the grunt work, and you handle the strategy.
Refining the AI-Generated Steps
Once the automated conversion is done, you’ll have a full sequence of steps laid out, ready for your review. This is your chance to perfect the flow and make sure every instruction lands perfectly.
Your editing workflow usually boils down to a few key moves:
Merging Steps: Sometimes the AI might separate two tiny actions, like clicking a field and immediately typing in it. You can merge these into a single, more natural step to make the guide flow better.
Splitting Steps: On the other hand, a single click might represent a big decision. You can split that into two separate steps, giving you room to add more detail or explain the "why" behind the choice.
Rewriting Text: The AI gives you a solid base, but you know your team's language best. Swap in your internal terminology, clarify why a step is important, or just adjust the tone to sound more like you.
This level of control is what makes the final guide feel like it was custom-built for your team. It’s not just a generic set of instructions; it reflects your unique workflows and vocabulary. To get a broader perspective on turning video into strategic assets, check out the definitive guide to repurposing video content. It's all about maximizing the value of every recording you make.
Expert Insight: The goal isn't just to document clicks; it's to transfer understanding. A great guide anticipates questions and provides context, turning a simple process into an empowering learning experience for your team.
This need for clear, efficient documentation is driving huge demand. The market for SOP software was valued at USD 1.2 billion in 2023 and is projected to grow significantly, especially as companies everywhere continue to digitize their operations. You can find more details on this growing market on dataintelo.com.
Ultimately, it’s the combination of smart automation and thoughtful human oversight that creates guides people actually use—and that you can create in a fraction of the time.
Enriching Your Guide with Context and Clarity
An automatically generated guide is a fantastic starting point. It does the heavy lifting for you, laying out the core steps and grabbing the right screenshots. It's a huge time-saver.
But to create a guide that actually prevents mistakes and helps your team move forward, you need to add the human element: context. This is where you turn a simple transcript of clicks into a resource people trust. It’s your chance to answer questions before they’re even asked and explain the why behind each action.
Without that extra layer, a guide is just a list of instructions. With it, it becomes a powerful teaching tool.
Going Beyond Basic Instructions
The first step is to get inside your audience's head. Where do people usually get stuck on this process? What might be confusing to someone seeing this for the first time?
Your rich-text editor is your best friend here. It lets you layer in extra meaning exactly where it's needed most.
Imagine a marketing agency creating a guide for setting up a new ad campaign. Instead of a generic template, they can customize it for a specific client. They might add the client's unique branding terms, link directly to their asset library, and add a quick warning about their specific budget constraints.
This small act of customization changes everything. It shows you understand their world and turns a generic process into a personalized playbook.
Adding Layers of Meaning with Rich Text
Your goal is to make the guide so clear that no one needs to tap you on the shoulder for help. That means using formatting to draw the eye and provide clarity before it’s requested.
Here are a few practical ways to enrich your guide:
Insert Cautionary Notes: For a step that's easy to mess up, add a small, bolded note. Something like, "Warning: Make sure you select 'Save as Draft' first. Publishing immediately will make it live."
Highlight Pro Tips: Use blockquotes to share expert advice that helps people work faster or smarter. This elevates a basic tutorial into something genuinely valuable.
Embed Checklists: For complex steps with multiple parts, a simple checklist ensures nothing gets missed. It breaks a big action into smaller, more manageable sub-tasks.
Key Insight: The best guides don't just show what to do; they explain why it's important and highlight how to avoid common mistakes. This proactive approach builds confidence and cuts down on support questions.
The diagram below shows the simple but powerful workflow that serves as the foundation for all this enrichment—turning a quick video into an interactive guide.
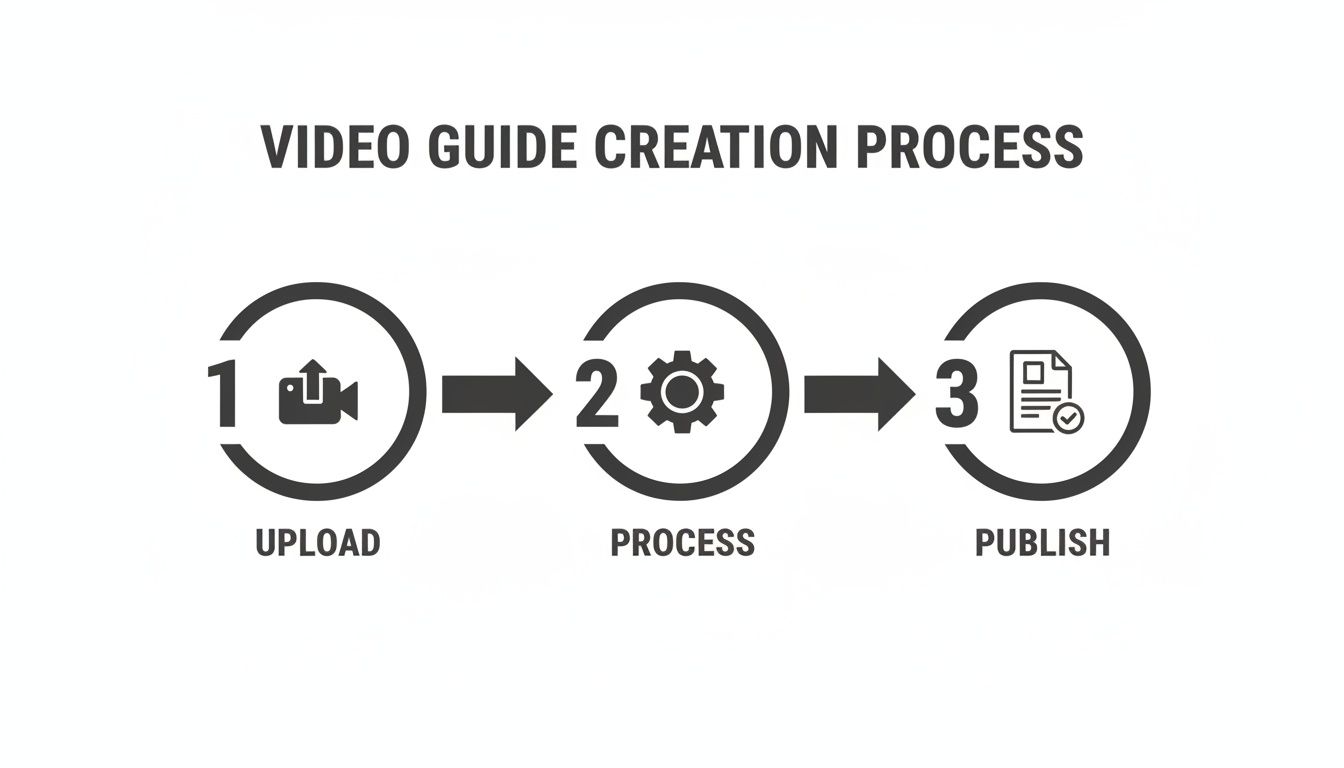
This flow—from video to a published document—is where your opportunity to add rich context begins, turning a raw process into a polished, instructional asset.
Making Screenshots Crystal Clear
Automated screenshots are a game-changer, but they become even more powerful when you annotate them. A raw screenshot of a busy interface can be overwhelming. Your job is to direct the user's eye to the exact button, field, or menu that matters for that specific step.
This is where visual aids come into play.
Use Arrows and Pointers: A simple arrow pointing to the "Export" button removes all guesswork. The user knows instantly where to look and click.
Add Callout Boxes: For more complex situations, a callout box with a short text label can provide crucial information. For instance, a box that says, "Enter the client code here."
Blur Sensitive Information: If your screen recording captured sensitive data like customer names or financial details, use a blur tool to hide it. This is absolutely essential for creating guides that can be shared widely without compromising privacy.
By annotating your screenshots, you make them scannable and instantly understandable. You reduce the mental effort required, letting users follow along without having to hunt for the right button on a crowded screen.
This is the kind of detail that separates an adequate guide from an exceptional one that people will actually use again and again.
Sharing and Governing Your Process Library
A brilliant guide is useless if your team can’t find it. Or worse, if they find it but don't trust it.
Once you’ve captured and polished a process, the final step is getting it into the hands of the people who need it. This isn't just about hitting "publish." It's about building a living, governed library of knowledge that actually scales with your team.
You have to get away from scattered Google Docs and that "tribal knowledge" trapped in someone's DMs. The goal is a single source of truth everyone can rely on. This is how all the effort you put into building a guide pays off for months and years to come.
Choosing Your Publishing Method
First, decide how you're going to share these guides. The right answer depends entirely on your audience and how they work.
A Branded Knowledge Hub: This is the gold standard for creating a professional, central home for your team's knowledge. With a tool like Build a Guide, you can create a branded, searchable hub that acts as your official playbook. It’s the perfect place to put all your SOPs, onboarding materials, and even client-facing tutorials.
Simple Link Sharing: Sometimes you just need to get an answer to someone fast. For a one-off support question or a quick process clarification, just sharing a direct link is incredibly efficient. A teammate gets the exact steps they need without having to hunt through a bigger library.
Most teams I see end up using a hybrid approach. They maintain a central hub for all the official, important documentation while using direct links for that quick, in-the-moment support.
Maintaining a Single Source of Truth
Creating a guide is just the start. Processes change, software gets updated, and best practices evolve. If you don't have a clear system for keeping your guides current, they'll become outdated and untrustworthy almost immediately.
This is where collaborative features are absolutely critical. Instead of a top-down, gatekept approach where one person owns all the documentation, you can empower your whole team to be part of the process. This creates a culture where everyone feels a sense of ownership over the team’s collective knowledge.
Pro Tip: Your best process insights will almost always come from the people doing the work every day. By letting them suggest edits and leave comments, you turn a static library into a dynamic, self-improving system.
Think about it. A marketing specialist might notice a small but critical change in a social media scheduling workflow. Instead of sending an email that gets lost, they can leave a comment right on the relevant step in the guide. The process owner gets a notification, makes the quick update, and boom—the guide is instantly accurate for everyone.
Using Templates for Consistency and Scale
As your library grows from 5 guides to 50, keeping things consistent becomes a huge challenge. You don't want your guide for requesting time off to look and feel completely different from your guide on submitting an expense report.
This is where templates become your secret weapon.
Once you’ve perfected a guide for a common type of process—say, a client onboarding checklist—you can save it as a template. The next time a similar guide is needed, you start with a pre-built structure, ensuring key elements and branding are always consistent.
This simple action has a massive impact:
It speeds up creation: No one is starting from a blank page every time.
It ensures quality: Best practices for formatting and clarity are baked right in.
It creates a better user experience: People know what to expect from every guide they open.
Ultimately, smart sharing and governance are what turn a folder of individual guides into a true, valuable knowledge base. For more ideas on structuring your content, our article on how to build a knowledge base is a great place to start. By putting these practices in place, you make sure your guides aren't just created, but are consistently found, trusted, and used to make everyone's work better.
Using Analytics to Improve Your Team's Performance
How do you know if the guides you're creating actually work?
Publishing a guide without measuring its impact is like flying blind. You need data to understand what's connecting with your team and, more importantly, what’s falling flat.
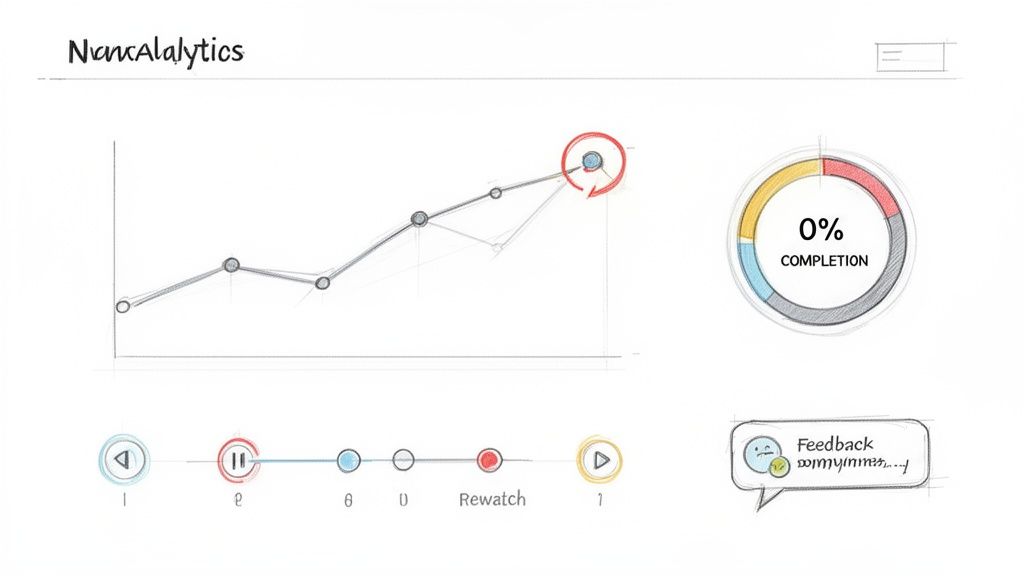
Simply looking at view counts isn’t enough. A high view count doesn't tell you if people understood the process or just gave up halfway through. To really improve your team's performance, you have to move past these vanity metrics and dig into engagement analytics that reveal the real story.
This data-driven approach is essential for any team that wants to create guides that genuinely help. The demand for flawless documentation is growing, especially in regulated industries. In fact, North America leads the SOP management market, commanding nearly 40% of the global share. You can find more details on this expanding market on openpr.com.
Key Metrics That Drive Improvement
To turn your documentation into a dynamic tool for process improvement, you need to focus on analytics that give you actionable insights. These are the numbers that tell you exactly where to focus your efforts.
Completion Rates: This is your most important metric. If only 20% of users ever finish a guide, it's a huge red flag. Low completion rates often point to a process that’s too long, confusing, or has a major roadblock somewhere in the middle.
Time Spent on Each Step: Where are people slowing down? Analytics can show you which steps users pause on or re-watch. This is invaluable feedback, highlighting complex areas that might need clearer instructions or an extra screenshot.
User Drop-Off Points: Pinpointing the exact step where most users abandon the guide is like finding a bug in your process. For a customer support team, this data can reveal a confusing part of your workflow before it creates dozens of support tickets.
Turning Insights into Action
Analytics aren't just for reports; they are a direct feedback loop for continuous improvement. When you see users struggling with a specific step, you have a clear mandate to make it better.
Expert Insight: Treat every guide as a living document. Use analytics to identify friction points, then iterate. A small tweak to a confusing step can have a massive impact on your team's efficiency and confidence.
For example, if you notice lots of users drop off at a step involving a complex software setting, you can:
Rewrite the instructions for more clarity.
Add an annotated screenshot with callouts.
Split the complex action into two simpler steps.
This iterative process, fueled by real user data, transforms your guides from static files into powerful tools for tuning performance. You stop guessing what your team needs and start knowing.
FAQ on Creating Video Guides
When teams start thinking about turning screen recordings into step-by-step guides, a few practical questions always pop up. It’s natural to wonder how this all works, especially if you’re used to writing docs the old-fashioned way.
Let’s tackle some of the most common ones.
Is My On-Screen Data Secure?
This is usually the first question people ask, and for good reason. Security isn't just a feature; it's a requirement.
Modern guide creation tools are built with this in mind. When you record a workflow, you often capture sensitive details like customer names or internal credentials. During the editing process, you can easily blur or redact that information.
This means you can record the real process without holding back, then sanitize the visuals before anyone else sees them. The final guide shows only what you want it to, keeping sensitive data locked down while still delivering a crystal-clear walkthrough.
How Does This Scale With a Growing Team?
This approach is actually built for scaling. Think about the alternative: a chaotic shared drive filled with hundreds of disconnected Word docs and outdated PDFs. It’s a mess.
Instead, you’re creating a central, searchable knowledge hub. As your team grows, new hires don't have to hunt for information or rely on "tribal knowledge" from a few key people. They get instant access to a library of consistent, up-to-date processes.
Key Takeaway: A centralized knowledge base is the antidote to "tribal knowledge," where critical process information lives in one person's head. It ensures your operations don't grind to a halt when that person goes on vacation or leaves the company.
Using templates also means every guide maintains the same format and quality. It becomes incredibly easy to create new documentation that feels professional and aligns with your standards, no matter who creates it.
Can It Integrate With Our Existing Tools?
While you might not find a direct API connection for every platform, the real value here is creating a single source of truth that plugs into your existing tool stack.
You can easily link to your guides from project management tools like Asana or Trello, embed them in an internal wiki like Confluence, or share them directly in Slack or Microsoft Teams.
The goal isn't to rip and replace your current setup. It's to make your existing tools better by giving your team clear, actionable process documentation that's always just a click away, right where they're already working.
Here are a few other common questions we hear from teams getting started.
Question | Answer |
|---|---|
How long should a recording be? | Keep it focused. Record one self-contained task at a time. A 2-5 minute recording is usually perfect for a single guide. |
What if a process changes? | That's the best part. Instead of re-recording everything, you just edit the specific step that changed. Update a screenshot, tweak the text, and you're done. |
Can non-technical people create guides? | Absolutely. If you can perform the task, you can record it. The software does the heavy lifting of breaking it down into steps. No special skills needed. |
Is this just for internal teams? | Not at all. It's fantastic for creating customer-facing tutorials, onboarding flows, and support documentation that reduces tickets. |
Hopefully, this clears things up! The best way to understand the power of this approach is to try it yourself.
Ready to transform your team's knowledge into an actionable library? Start building with Build a Guide and see how easy it is to create guides people actually use. Get started for free today.