
January 10, 2026
Boost Your Business with client onboarding process template: A Proven Framework

Discover a proven client onboarding process template to build trust, reduce churn, and start delivering value from day one.
A solid client onboarding template is your playbook for turning a brand-new customer into a long-term partner. It’s a repeatable, step-by-step framework that covers everything from signing the contract and gathering info to kicking off the project and delivering that all-important first win.
This isn’t just about having a checklist. It's a strategic tool for growth, ensuring every client gets the same professional, confidence-building experience, every single time.
Why a Standardized Onboarding Process Drives Growth
Winging your client onboarding is a recipe for chaos. When every new client gets a different welcome, messages get mixed, crucial steps get missed, and the first impression you make is one of disorganization. That inconsistency quietly kills momentum and hurts your bottom line.
A standardized client onboarding process template changes that dynamic completely. It stops being a liability and becomes a genuine growth engine. By defining each step, you eliminate guesswork for your team and anxiety for your new client.
Onboarding Chaos vs Onboarding Clarity
The difference between an improvised welcome and a structured one shows up in real business metrics. It’s not just about feeling more organized; it’s about performing better.
A quick comparison makes the impact obvious:
Metric | Ad-Hoc Onboarding (Without a Template) | Standardized Onboarding (With a Template) |
|---|---|---|
Time to Value | Slow and unpredictable. | Fast and consistent. |
Client Confidence | Low. The client feels uncertain and anxious. | High. The client feels reassured and guided. |
Team Efficiency | Poor. Constant reinvention and duplicated effort. | Excellent. Clear roles and repeatable actions. |
Scope Creep | Common. Vague kickoffs invite extra requests. | Rare. Scope and expectations are set clearly upfront. |
Churn Risk | High. A poor first impression is hard to recover from. | Low. Trust is built from the very first interaction. |
Having a template isn't just about internal process—it’s about delivering a fundamentally better, more profitable client experience.
The Real Cost of an Inconsistent Welcome
An ad-hoc approach creates invisible costs that slowly eat away at your profitability and reputation. Without a template, you're constantly reinventing the wheel.
This leads to some familiar problems:
Scope Creep: Vague expectations set during a disorganized kickoff are the #1 cause of clients asking for "just one more thing." A template formalizes the scope from day one.
Team Burnout: Your team wastes hours figuring out who does what, chasing down documents, and answering the same questions over and over. This administrative drag is a morale killer.
Reduced Client Confidence: A messy start sends a clear signal: if you’re this disorganized with onboarding, you’ll probably be disorganized with the actual work. Trust takes a hit before the relationship even begins.
A structured onboarding process isn't just about making a good first impression. It's about systematically setting the stage for long-term success, reducing churn, and creating a scalable foundation for your business.
The Power of a Repeatable System
The benefits of a repeatable system are real and measurable. While much of the data focuses on employees, the core principle is the same for customers: structure builds loyalty.
For example, companies with a strong, standardized onboarding process improve new-hire retention by 82% and productivity by over 70%. That’s the power of a documented, repeatable system. It’s a massive lever for engagement and long-term success.
A template ensures every client gets the same high-quality welcome, which is one of the core ideas behind customer onboarding best practices. This consistency builds trust and reassures them they made the right choice.
Ultimately, it lets you set clear expectations, gather what you need efficiently, and prove your value from the very first touchpoint. That’s how you pave the way for a successful, lasting partnership.
The Complete Client Onboarding Template You Can Use Today
Alright, let's get to the good stuff. Here is a battle-tested client onboarding process template you can steal and start using right away. Think of it less as a rigid script and more as a flexible framework. The goal is to build momentum, establish trust, and prove your value from day one.
A structured process is what turns a chaotic start into a clear path toward real client growth.
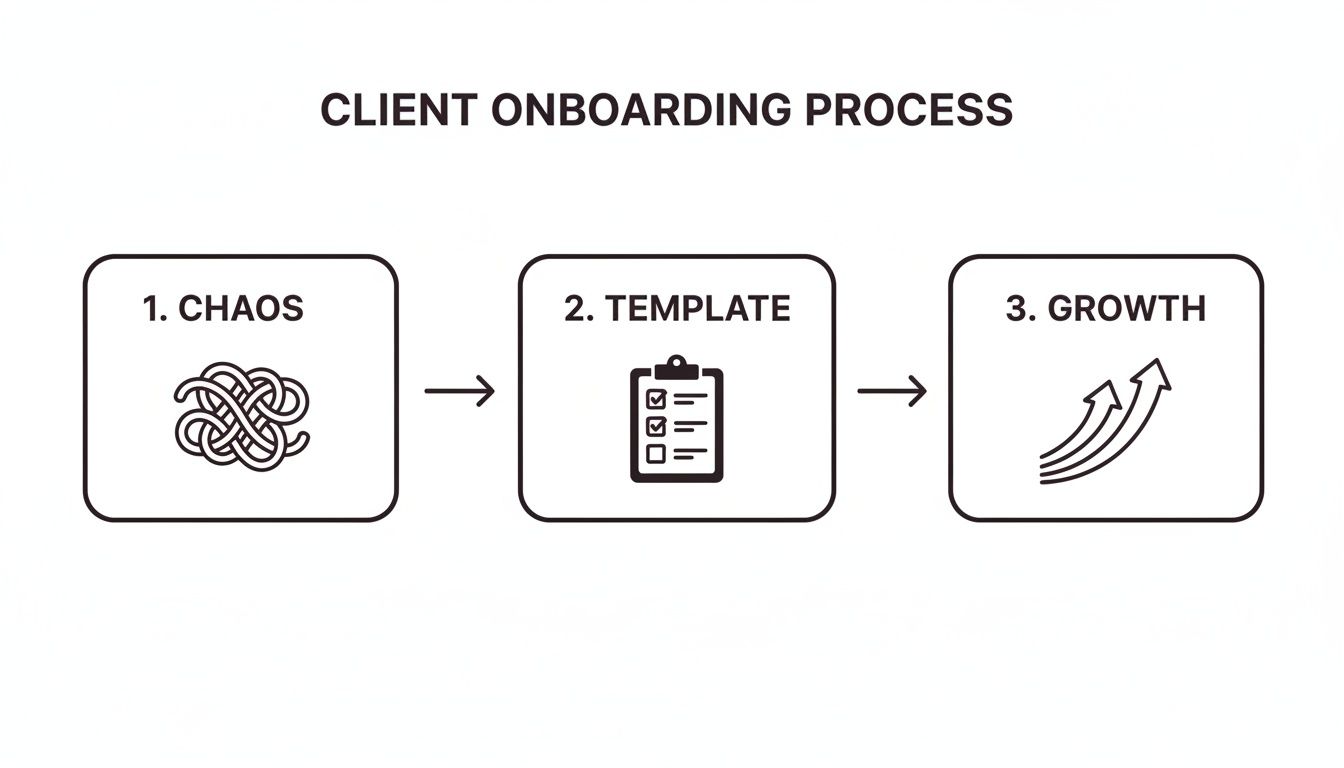
This journey from confusion to clarity is everything. A solid template isn't just a nice-to-have; it's the tool that makes successful, scalable relationships possible.
We've broken the whole thing down into four distinct phases, each with its own checklist of tasks and key deliverables.
Phase 1: Pre-Kickoff and Paperwork
This is all about setting a professional tone and knocking out the admin work without any friction. A smooth start here builds instant confidence and prevents silly delays later. It’s where you officially shift from "prospect" to "partner" in the client's mind.
The goal? Make the client feel great about their decision while your team quietly gathers everything it needs. This isn't just about paperwork; it's about laying a solid foundation for the entire relationship.
Your Pre-Kickoff Checklist
Finalize and Sign the Contract: This is always step one. Use a digital signature tool to make it fast and painless. Make sure every term, the scope, and all deliverables are crystal clear to avoid headaches down the road.
Process the First Invoice: Send it the moment the contract is signed. Getting paid promptly is obviously good for cash flow, but it also signals that the project is officially a go.
Send a Welcome Email: Don't just fire off a generic, automated message. It needs to come from the main point of contact, express genuine excitement, and lay out the immediate next steps. Tell them exactly what to expect before the kickoff meeting.
Gather Info with an Intake Form: Create a smart, easy-to-fill-out form to collect logins, brand assets, and background details. This one step will save you days of back-and-forth emails.
Assemble the Internal Team: Assign the right people based on the client’s needs. Hold a quick internal huddle to go over the scope, goals, and any important context from the sales process.
Set Up Project Management Tools: Create the project in your system of choice (like Asana, Trello, or Jira). Get the team invited and start building out the initial tasks.
Send a Welcome Package: This is a small touch with a massive impact. A box with some company swag, a handwritten note, or a small gift relevant to their business shows you care beyond the contract.
Pro Tip: Automate the contract-to-invoice workflow. Tools exist that can automatically generate and send the first invoice the second a contract is e-signed. This simple automation removes a manual step and cuts down your time-to-cash.
Phase 2: The Kickoff Meeting
The kickoff meeting is the official starting gun for the project. It has one job: get both teams aligned on goals, timelines, and how you’ll communicate. A well-run kickoff sets the tone for everything that follows, moving you from admin tasks to a true strategic partnership.
This isn't just a formality. It’s your chance to show you’re in control, confirm you understand their challenges, and build a real connection with the key stakeholders.
Your Kickoff Meeting Checklist
Circulate a Clear Agenda Beforehand: Send it at least 24 hours in advance. This ensures everyone shows up prepared and shows you respect their time.
Start with Intros and Roles: Go around the room and have everyone introduce themselves and explain their role. This is critical so the client knows exactly who to contact for what.
Reconfirm Goals and KPIs: Verbally confirm the main objectives. I always like to ask, "From your perspective, what does a huge success look like when this project is done?" It makes sure everyone is aiming for the same target.
Review the Timeline and Milestones: Walk through the high-level timeline. Spend extra time on the first 30 days and call out the major milestones and deliverable dates. This manages expectations from the jump.
Establish Communication Rules: Define how and when you'll talk. Is there a weekly status call? Will updates be in your project management tool? Who is the single point of contact on both sides? Nail this down now.
Discuss Client "Homework": Clearly outline what you need from them and when you need it. This is one of the biggest sources of project delays. Framing it as "homework" makes it feel more actionable.
Leave Time for Q&A: The last 10-15 minutes should always be open for their questions. This is where you can address any lingering doubts and make them feel completely confident in your process.
Phase 3: The First 30 Days of Implementation
The first month is when you have to back up all the promises made during the sales process. This period is all about scoring an "early win" to demonstrate value and build some real momentum. If you go quiet or fail to show progress here, you're in trouble.
Failing to deliver something tangible in the first 30 days is a classic reason for early churn. This is where your client onboarding process template really starts to pay for itself.
Your First 30 Days Checklist
Deliver a Quick Win: Find a small, valuable goal you can knock out in the first week or two. This could be a technical audit, a competitor analysis, or setting up a key piece of software. Delivering this early validates their decision to hire you.
Provide a Training Session: If they need to learn a new tool or process, schedule a dedicated session. Make sure you record it so they can reference it later without having to ask you again.
Send the First Weekly Status Report: At the end of week one, send a simple progress report. It should cover what you did, what’s next, and any blockers. Keep it short and consistent.
Schedule a 30-Day Check-in Call: Put this on the calendar during the kickoff. This call is just to review progress, get feedback on how things are going, and make any course corrections.
Keep Everything in a Shared Hub: Use your project tool or a shared document to keep all communications, files, and deliverables in one place. This transparency builds a ton of trust.
Phase 4: Transitioning to Ongoing Success
After that initial 30-day sprint, the focus shifts from setup to sustained value. The final phase of onboarding is about moving the client from a high-touch, hands-on experience to the normal, ongoing rhythm of your service.
The goal is a seamless handover to the long-term account manager or success team and reinforcing the habits of a healthy partnership. This is also where you plant the seeds for future renewals and expansion.
Your Transition Checklist
Formally Review the First 30/60/90 Days: Hold a meeting to show off the progress made against the original KPIs. Use it as a chance to celebrate the early wins and remind them of the value you've already delivered.
Introduce the Long-Term Account Manager: If the point of contact is changing, this needs to be a warm handoff. Have the onboarding specialist introduce the long-term manager and stay involved for a week or two to ensure a smooth transition.
Establish a Regular Reporting Cadence: Lock in the schedule for ongoing reports and meetings, like monthly performance reviews or quarterly strategy calls. This sets the expectation for proactive communication.
Gather Feedback on Onboarding: Send a short survey asking about their onboarding experience. What went well? What could have been better? This feedback is gold for improving your process. If you want to get serious, you can turn these learnings into a formal standard operating procedure template to document your internal improvements.
Plan the Next Phase of Work: Start talking about what's next. This shows you’re thinking strategically about their long-term success, not just checking boxes on the initial scope. This kind of forward-thinking is the key to retention.
How to Customize Your Onboarding Template for Any Client
A rigid, one-size-fits-all onboarding template is a recipe for frustration. If you treat a fast-moving marketing agency the same way you treat a detail-oriented consulting client, you're setting everyone up for misaligned expectations and friction from day one.
The real power of a template isn't its strictness; it's the solid foundation it gives you to build from.
Think of your core template as the chassis of a car. The engine, wheels, and destination will change depending on the journey, but the core structure remains reliable. You just need to know which parts to swap out for different client types to get them where they're going, fast.
This isn't just a nice-to-have anymore. Data shows that 63% of customers factor the onboarding experience into their buying decision, and a huge 87% expect companies to deliver a consistent experience across all touchpoints.
Plus, with 65% of users saying video is their preferred way to learn, it’s no surprise that agencies and customer success teams are moving toward media-rich, adaptable templates that get clients to value faster. You can find more insights on this from the team at Custify.com.
Customizing for a Marketing Agency
When you're bringing on a marketing agency, speed and access are everything. They need to get into your systems, absorb your brand, and start launching campaigns—yesterday. Your template has to prioritize technical setup and creative alignment right out of the gate.
The main shift here is to front-load anything that could become a bottleneck. Forget the generic welcome packet. What they really need is a "Campaign Launch Kit."
Agency Onboarding Checklist Modifications:
Priority 1 Asset Collection: Your intake form must demand immediate access to the essentials: ad accounts, Google Analytics, brand guidelines, and high-res logos. Don't wait.
Split the Kickoff: The main kickoff meeting should be split. Part one is for strategy, but part two—a mandatory technical call with their implementation specialist—needs to happen within 48 hours.
Early Reporting Dashboard: Don't wait a month to show them data. Set up a basic reporting dashboard within the first week, even if it only shows setup progress. This builds immediate trust and transparency.
A PPC agency doesn’t need a deep dive into your company’s five-year vision on day one. They need the keys to your Google Ads account and your negative keyword list. Prioritizing that gets them producing results faster, which is all that matters.
Tailoring for a SaaS Company
Onboarding a SaaS client is all about product adoption. The entire journey should guide them from basic setup to their first "aha!" moment as quickly and smoothly as possible. The focus shifts from gathering assets to driving specific, valuable in-app actions.
Your template needs fewer meetings and more self-serve education and guided product tours.
The goal of SaaS onboarding is to make your product feel indispensable. Each step in your process should be designed to get the client to a point where they say, "How did we ever manage without this?"
SaaS Onboarding Checklist Modifications:
Role-Based Learning Paths: Segment your welcome materials. An admin needs to know about billing and user management. A daily user needs to master core workflows. Don't give them the same guide.
Define the First Value Milestone: Figure out the single most important action a new user must take to see value. Your entire first week of onboarding should be laser-focused on getting them to that one task.
Use In-App Checklists: Ditch the generic PDF checklists. Replace them with an interactive, in-app onboarding guide. This creates a guided experience and lets you track their progress without asking.
Imagine you're onboarding a client to a project management tool. The "quick win" isn't a welcome call; it's getting them to create their first project, assign one task, and set a due date. That simple, tangible action proves your product’s value better than any slide deck ever could.
Adapting for a Consulting Project
Consulting projects are built on discovery and deep strategic alignment. Unlike a SaaS tool, the value isn't in a product—it's in your expertise. So, the onboarding process has to be designed to facilitate knowledge transfer and build solid trust with key stakeholders.
Your template needs to pivot from quick wins to deep listening. The whole game is about structured interviews, document review, and setting a collaborative tone from the start.
Consulting Onboarding Checklist Modifications:
Stakeholder Interview Blitz: This is your new first step. Before any big kickoff meeting, your process must include identifying and scheduling 30-minute discovery calls with every key stakeholder.
Create a Centralized Document Hub: Immediately create a secure, shared folder and request all relevant documents—past reports, strategic plans, org charts. Often, your first deliverable is just synthesizing what they already have.
Co-Create the Timeline: The kickoff meeting isn’t for you to present a timeline. It's a workshop where you build the project timeline with the client. This creates immediate shared ownership and manages expectations from day one.
Turning Your Onboarding Checklist Into a Living Guide
A static checklist in a Word doc or PDF is where even the best-laid plans go to die. It’s a reference point, sure, but it isn’t a guide. To truly scale a high-touch experience, you have to transform your client onboarding process template from a flat document into a living, interactive experience.
Modern tools let you build dynamic guides that do the heavy lifting for you. Instead of just listing a step, you can embed a quick screen recording that shows the client exactly how to complete it.
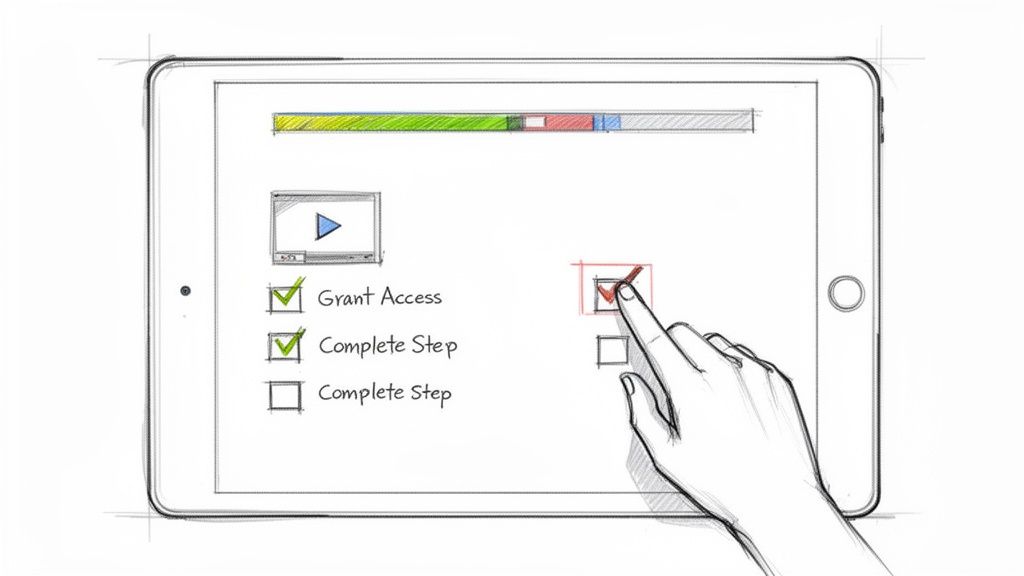
This simple shift turns onboarding into an engaging, self-serve journey clients can tackle on their own time. It moves the process from a passive checklist to an active, guided experience.
Why Interactive Guides Are Non-Negotiable
Let’s be honest, the old way of onboarding—endless email threads and hour-long screen-share calls—doesn't scale. It burns out your team with repetitive tasks and overwhelms clients with information they can't easily reference later.
An interactive guide solves both problems.
Imagine turning the dreaded "Granting Analytics Access" step into a self-serve guide your client can follow in five minutes. That one change frees up your team from another live call, letting them focus on high-value strategic work instead. It’s about reducing cognitive overload for everyone.
The data backs this up. One study found that over 52% of employees felt administrative tasks dominated their onboarding. Given that 63% already use online training videos and 52% rely on process docs, the need for an integrated, multi-format guide is obvious. And with nearly 32% of employees now relying more on AI tools than asking coworkers, the demand for searchable, self-serve guides is only growing.
Key Elements of an Interactive Onboarding Experience
Building an interactive experience isn’t about flashy tech; it’s about combining different media formats to make complex steps feel simple. Your goal is to anticipate questions and provide answers before they're even asked.
Here are the core components you'll need:
Embedded Screen Recordings: For any technical task, show, don't just tell. A two-minute video of you navigating a software interface is infinitely more helpful than a dense paragraph of text.
Actionable Checklists: Don't just list tasks for your team; create checklists the client can actively complete. This gives them a sense of progress and ownership over the process.
Clear Text Instructions: Use short, scannable text to support your visuals. Break down each action into a distinct step. This is a fundamental principle when you create a step-by-step guide that people will actually follow.
Embedded Forms and Links: Need the client to fill out an intake form or access a shared drive? Embed the link directly within the relevant step. Don't make them hunt for it.
By turning your template into an interactive guide, you're not just creating a document; you're building a reusable asset. It becomes a scalable, consistent, and professional experience you can deliver to every new client with minimal effort.
Tracking Engagement to Spot Bottlenecks
One of the biggest advantages of a digital, interactive guide is the ability to finally see what's happening. With a static PDF, you have no idea if the client even opened it.
With a modern platform, you can see crucial data in real-time:
Who has viewed the guide: Confirm that key stakeholders are actually engaged.
Which steps are completed: See exactly where the client is in the process without having to ask.
Where people get stuck: Notice if clients repeatedly pause or re-watch a specific step? That's a clear signal that the instructions for that part need to be improved.
This data is invaluable. It turns your onboarding process from a black box into a transparent, measurable system you can continuously refine. This is how you move from just having a process to having a system that actively drives client success.
How to Measure Your Onboarding Success
A great onboarding process shouldn't just feel good—it has to deliver real, measurable results. If you can't prove the ROI of your new client onboarding process template, you're just guessing. Tracking your success with hard data is the only way to know what’s working and pinpoint exactly where you can get even better.
This isn't about vanity metrics. It’s about moving away from guesswork and toward a data-driven system that you can scale with confidence.
Let’s break down the essential key performance indicators (KPIs) you should be watching.
The Onboarding KPIs That Actually Matter
Tracking the right metrics tells you a story. Are clients getting value quickly? Are they actually using the tools you give them? Are they happy? These KPIs give you the answers.
Forget trying to measure everything. Focusing on a few high-impact metrics is far more effective.
Key Takeaway: You can't improve what you don't measure. A clear set of KPIs transforms onboarding from a simple checklist into a strategic function that directly impacts client retention and lifetime value.
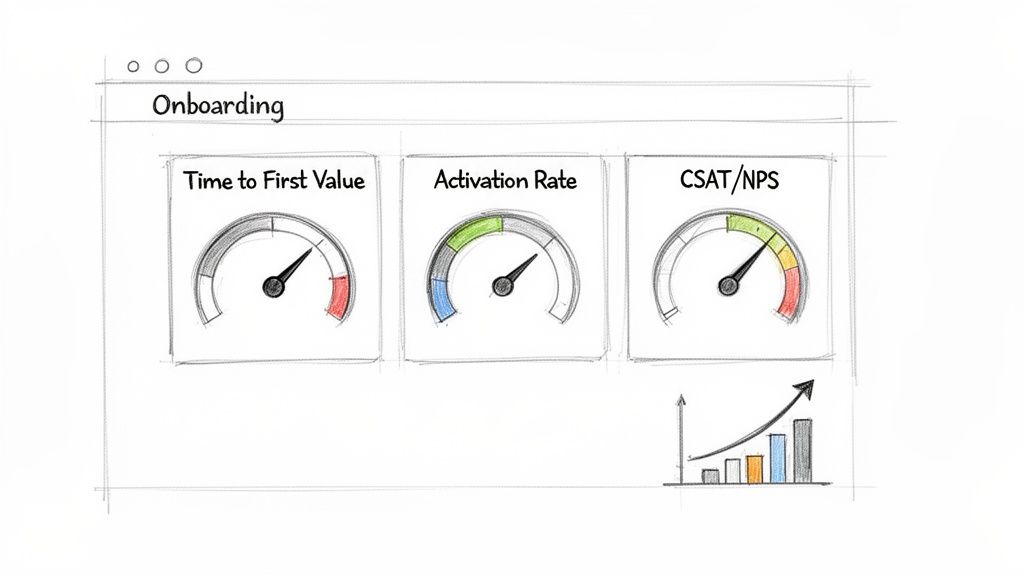
To get started, here are the most important metrics to put on your dashboard.
Key Onboarding KPIs and What They Tell You
These metrics give you a clear, unbiased look at how well your onboarding is performing.
KPI | What It Measures | Why It Matters |
|---|---|---|
Time to First Value (TTFV) | The time it takes a new client to get a meaningful win or "aha!" moment. | This is the ultimate test of your efficiency. A shorter TTFV means happier clients who see immediate ROI and are less likely to churn. |
Client Activation Rate | The percentage of clients who complete key setup steps within a specific timeframe (e.g., the first 30 days). | A high activation rate signals your onboarding is clear, actionable, and effectively guides clients to use your product or service as intended. |
Early-Stage Satisfaction Scores | How happy clients are immediately after the onboarding period, measured with CSAT or NPS surveys. | This gives you an immediate signal on the client experience, letting you fix issues long before they turn into bigger problems. |
Each of these KPIs provides a different piece of the puzzle, giving you a complete picture of your onboarding health.
How to Apply These Metrics to Your Business
These core KPIs aren't one-size-fits-all. You have to adapt them to fit what "value" and "activation" actually mean for your business.
What constitutes a "win" for a marketing agency is totally different from that of a SaaS platform.
For example, an agency's Time to First Value might be the day the first ad campaign gets client approval. For a consultant, it could be the moment they deliver the initial discovery audit and recommendations.
Likewise, Activation Rate for a SaaS business is almost always tied to product adoption. You might track the percentage of new users who adopt a "sticky" feature—one that you know correlates with long-term retention.
By defining these metrics for your unique context, you create a powerful feedback loop. You can see the direct impact of any change you make to your client onboarding process template, helping you refine your approach based on what actually works for your clients.
Common Questions About Client Onboarding Templates
Even the best template raises questions once you start putting it into practice. That’s a good thing. A great client onboarding process template is a living document, and sorting through these common sticking points is how you refine your process and build team confidence.
Let's get into some of the questions that come up most often.
How Long Should This Actually Take?
This is usually the first question, and the honest answer is: it depends. There’s no magic number. The right timeline is dictated entirely by the complexity of what you're delivering.
A simple SaaS product might only need a few self-serve steps that a client can finish in an afternoon. On the other hand, a deep consulting engagement could easily require a structured 30-day process filled with discovery calls and stakeholder interviews.
The goal isn’t speed for its own sake—it's momentum. You want to get the client to their first meaningful win (Time to First Value) as efficiently as possible, without making them feel rushed or overwhelmed.
When Does Onboarding Officially Start?
Onboarding kicks off the second the contract is signed and the first payment clears. This marks the official handoff from your sales team to whoever is handling delivery or customer success.
If you jump the gun and start before the paperwork is final, you create confusion and risk. But if you wait too long after the signature, you kill all the excitement and trust you just spent weeks building.
A solid cadence looks something like this:
Immediately After Signature: The welcome email and intake form go out.
Within 24 Hours: The project is created internally and assigned to the team.
Within 3-5 Business Days: The official kickoff meeting is on the calendar.
This rhythm shows the client they’re a priority from day one. It sets a professional, organized tone that immediately reinforces their decision to choose you.
What Tools Do I Need to Make This Work?
You don't need a huge, expensive tech stack to run a smooth onboarding process. The trick is to use tools that simplify communication and cut down on manual work for both sides.
Start with the essentials and build from there.
A Project Management Tool: Something like Asana, Trello, or ClickUp is non-negotiable for tracking tasks and keeping your internal team on the same page.
A Document Sharing Hub: You need a secure, shared space for swapping files and assets. A Google Drive or Dropbox folder gets the job done.
An Interactive Guide Platform: This is the real game-changer. Instead of sending static PDFs that get ignored, a tool that creates interactive guides with embedded videos and checklists makes the whole process feel modern, self-serve, and scalable.
The last piece of the puzzle is figuring out who owns this process. In smaller companies, it’s often the founder or a senior account manager. But as you grow, having a dedicated person—like a Customer Success Manager or a designated Onboarding Specialist—is what ensures every client gets the same great experience. That person becomes the client's trusted guide, responsible for making sure their transition into a long-term partner is completely seamless.
Turn your static checklists into polished, interactive experiences your clients will love. Build a Guide helps you create beautiful, step-by-step SOPs from screen recordings in minutes, making your client onboarding process scalable and professional. Start building better guides today at https://buildaguide.app.