
February 7, 2026
How to Improve Customer Onboarding Process With a Practical Guide

Learn how to improve customer onboarding process with this practical guide. Get actionable steps for mapping journeys, automation, and boosting retention.
If your onboarding feels clunky, you’re not just annoying customers—you’re actively losing them. A confusing start doesn’t just frustrate people; it pushes them out the door, often for good.
That initial experience sets the tone for the entire relationship. A bad first impression almost guarantees a quick churn.
The costs pile up fast: more support tickets, missed upsell opportunities, and a spike in cancellations within the first 90 days. For anyone in operations, customer success, or at an agency, showing value from day one is everything. Onboarding isn't a feature; it's the foundation of customer loyalty.
Rethinking Your Customer Onboarding From Day One
To build a process that actually works, you need to focus on four pillars. Each one addresses a critical part of how new customers learn, engage, and find value in your product.
The Four Pillars of High-Impact Onboarding
Forget generic welcome emails and confusing dashboards. A truly effective onboarding experience is built on a simple, repeatable framework.
Journey Mapping: Before you can fix the path, you have to walk it yourself. This means auditing every single touchpoint from the customer’s perspective to find where the friction is.
Personalization: One size never fits all. Segmenting users by their role or what they want to achieve lets you deliver guidance that speaks directly to their problems.
Automation: Manual, repetitive tasks create bottlenecks and slow everything down. Smart automation delivers the right message at the right time and frees your team up for high-value conversations.
Optimization: A great onboarding process is never finished. It's a living thing that evolves based on real data, user feedback, and changes to your product.
This isn't a one-and-done project. It's a cycle.
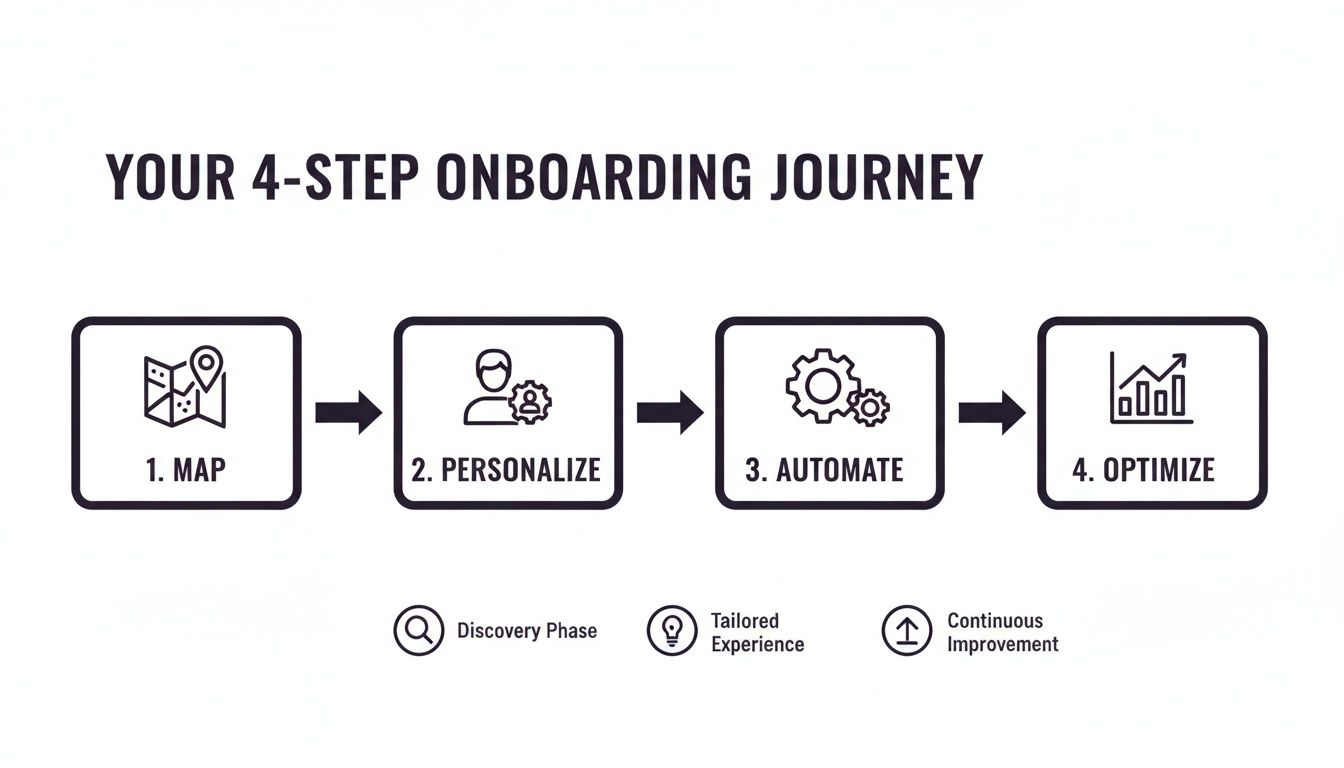
As the infographic shows, what you learn from optimizing your process feeds directly back into mapping the journey all over again. It’s a continuous loop of improvement.
The goal isn’t just to show customers how to use your product. It's to guide them to their first meaningful win as fast as possible. That "aha!" moment is what turns a trial user into a long-term advocate.
To really elevate your customer journey, start by digging into proven customer onboarding best practices that are laser-focused on getting users to the finish line.
By connecting these four pillars, you build a system that stops churn before it starts and turns new users into confident, successful customers. This playbook will walk you through exactly how to do it.
Auditing and Mapping Your Existing Onboarding Journey
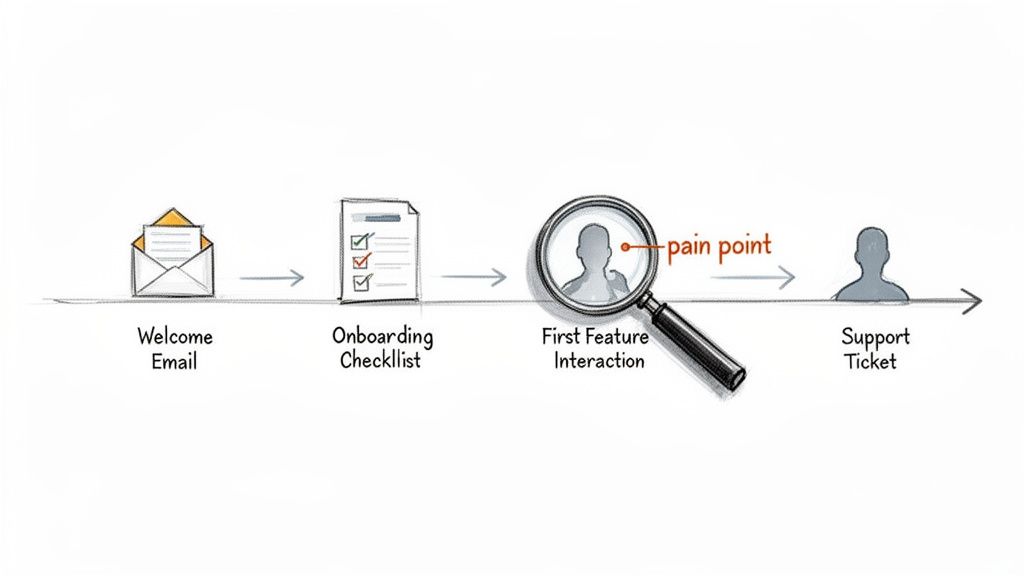
Before you can fix your customer onboarding, you have to live it.
It’s impossible to solve friction points you don’t know exist. The only way to find them is to put yourself in your customer’s shoes and walk through every single touchpoint—from the moment they sign up to their first real interaction with your product.
This isn’t just a bug hunt. You’re looking for the subtle moments of confusion, the frustrating dead ends, and the complete lack of delight that cause new users to quietly give up and disappear.
This initial audit is critical because your perception of the journey and your customer's reality are often miles apart. What feels intuitive to your team can be a major roadblock for someone seeing it for the first time.
Gathering Unfiltered Customer Feedback
Your own walkthrough is a great start, but it's not enough. You need to see the process through your customers' eyes by gathering real-world data. Analytics dashboards tell you what is happening, but qualitative feedback tells you why.
Start digging into these three goldmines of information:
Support Ticket Analysis: Your support team is on the front lines. Pull all the tickets from new users in their first 30 days and look for patterns. Recurring questions about the same feature or confusion over your UI are your most obvious friction points.
User Session Recordings: Tools like Hotjar or FullStory let you watch anonymized recordings of actual user sessions. There's no clearer evidence of a broken experience than watching someone hesitate, rage-click, or abandon a task altogether.
Targeted Surveys: Forget the generic "How are we doing?" emails. Use short, in-app surveys that trigger right after a key action. For example, once a user finishes your setup wizard, ask: "On a scale of 1-5, how easy was that to complete?"
This isn’t about collecting complaints. It’s about building a database of evidence that will justify every change you make later.
Creating Your Customer Journey Map
With all this raw feedback, it's time to make it visual. A customer journey map is a diagram of the entire onboarding experience from your customer's perspective. It becomes your team's shared blueprint for improvement.
If you’re new to this, looking at SaaS sample user journey maps can provide a solid foundation for structuring your own and making sure you don't miss any critical stages.
To build your map, create a timeline with the key stages of your current onboarding flow. This might include:
Signup: The initial account creation.
Welcome Email: The very first communication they get.
First Login: What they see and are asked to do immediately.
Core Task Setup: The steps required to get their first "Aha!" moment.
Feature Discovery: How they learn about everything else you offer.
Under each stage, document the customer's actions, their likely emotions (excitement, confusion, frustration), and the specific pain points you found in your research. If you need a head start, our team put together a complete client onboarding process template you can adapt.
A journey map transforms abstract data into a compelling story. It forces every team member—from engineering to marketing—to see the onboarding process through the customer's eyes and builds consensus on what needs to be fixed first.
Prioritizing the Biggest Opportunities
Once your map is complete, you’ll probably have a long list of things to fix. Don't try to tackle everything at once. That's a recipe for burnout and minimal impact.
Instead, focus on the issues that have the biggest influence on user success and retention.
Did you know that 63% of customers consider the onboarding experience when deciding whether to subscribe to a service? Those first few interactions are make-or-break. This is why fixing major roadblocks early in the journey should always be your top priority.
Look for patterns in your map. If 30% of new users submit a support ticket about the same integration step, that's a five-alarm fire. If a user recording shows someone giving up after failing to find a key button, that’s a high-impact, low-effort win.
Use your journey map to pinpoint these moments and make them the focus of your redesign.
Designing a Scalable and Personalized Onboarding Flow
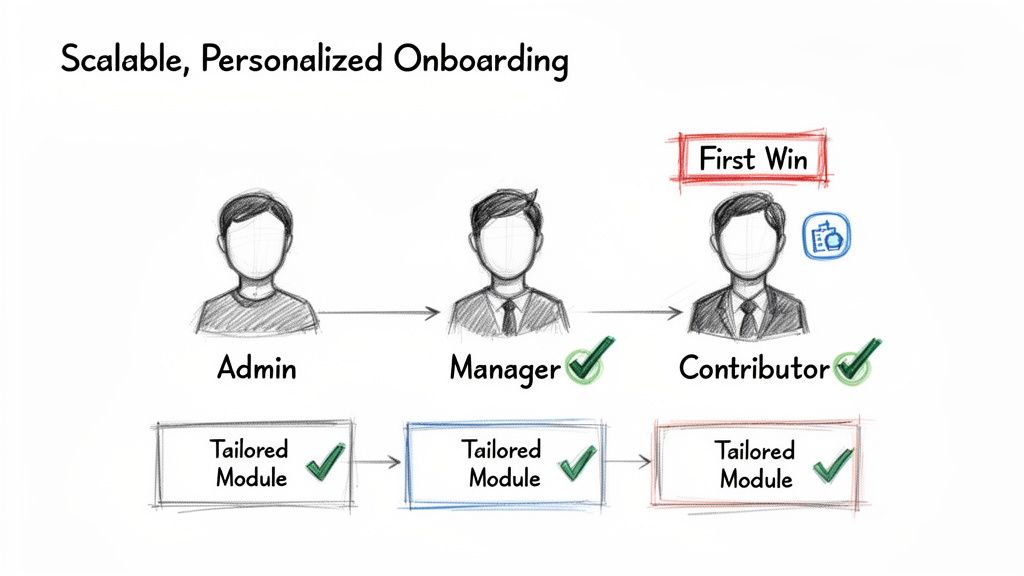
Your journey map showed you where things were breaking. Now it’s time to build a better path—one that feels personal to each user but doesn’t require a massive team to run. The secret isn't reinventing the wheel for every customer, but creating a core onboarding flow that you can adapt and scale.
A one-size-fits-all approach is a recipe for disengagement.
An administrator logging in for the first time has completely different needs than a content creator. Showing them the same generic tour is a wasted opportunity to prove your product's value to them. The goal is to design an experience that guides each user to their specific "aha!" moment as fast as possible. This is where personalization stops being a buzzword and becomes your most powerful tool.
Segmenting Users for a Tailored Experience
First, figure out your key user personas or roles. For a project management tool, this might be "Project Manager," "Team Member," and "Client." For a platform like Build a Guide, it could be "Agency Admin," "Content Creator," and "End User."
Once you have these segments, you can create slightly different paths for each. This doesn’t mean building three separate onboarding systems from scratch. You create a core set of steps, then use tailored content to guide each segment through the features most relevant to them.
Here are a few ways to do this:
Role-Based Welcome Screens: Ask users their role during signup. Use that to customize the very first screen they see, highlighting the top three actions they should take.
Targeted In-App Tours: Ditch the one long product tour. Instead, create shorter, feature-specific tours that trigger based on the user's segment. A "Team Member" might get a tour of collaboration features, while a "Manager" sees the reporting dashboard first.
Customized Checklists: Display a unique onboarding checklist for each role. This gives users a clear, relevant set of tasks to complete and motivates them to explore in a way that matches their goals.
This segmented approach ensures every user feels understood from their first login, which dramatically increases their chances of sticking around.
Accelerating Time to First Value
The single most important goal of onboarding is to shrink the Time-to-First-Value (TTFV). This is the moment a customer gets the benefit they signed up for. The faster you get them there, the less likely they are to churn.
Identify the "first win" for each of your user segments. What’s the one key action that delivers a meaningful outcome and makes them think, "Yes, this is exactly what I needed"?
Your entire onboarding flow should be engineered to get the user to this "first win" with the least amount of friction possible. Strip away any unnecessary steps, fields, or distractions that stand in their way.
For an invoicing tool, the "first win" is successfully sending the first invoice. For a Build a Guide user, it might be creating and sharing their first interactive SOP. All your initial prompts, tutorials, and emails should be laser-focused on that one outcome. This clarity is what separates a confusing onboarding process from a highly effective one.
Building Interactive SOPs for Scalable Guidance
One of the biggest onboarding challenges is explaining complex workflows without overwhelming people. Long help articles or passive videos often fail because users can't easily apply the information in real time.
This is where interactive SOPs become a game-changer.
Instead of just telling users what to do, you can show them with step-by-step guides embedded directly in your app or help center. This turns a complex process into a simple, follow-along tutorial. By creating a library of these guides, you build a support system that scales. To go deeper, you can learn how to build a knowledge base that acts as a central hub for all your documentation.
To help you map this out, here’s a breakdown of key touchpoints and how to optimize them.
Key Onboarding Touchpoints and Optimization Tactics
This table outlines critical stages in the customer onboarding journey and provides specific tactics for improving the experience at each point.
Onboarding Stage | Objective | Recommended Tactic |
|---|---|---|
Welcome Email | Set expectations and drive the first login. | Personalize with the user's name and provide a single, clear call-to-action to log in and start a key task. |
First Login | Guide the user to their "first win" immediately. | Use a role-based welcome screen that highlights the 2-3 most relevant actions for their specific user segment. |
In-App Tour | Introduce core features without overwhelming. | Replace long, generic tours with short, contextual tooltips that appear as users explore relevant features. |
Checklist | Motivate users to complete key setup tasks. | Display a dynamic checklist with 3-5 high-impact tasks. Visually show progress as they complete each one. |
Follow-up Emails | Reinforce value and prompt next steps. | Send behavior-based emails. If a user completes a task, suggest the next logical step. If they are stuck, offer help. |
Help Documentation | Provide on-demand, self-service support. | Create a library of interactive, step-by-step guides for common workflows instead of static help articles. |
By focusing on these specific interactions, you can systematically remove friction from the user's path to success.
Consistency across all of these touchpoints is key. In fact, research shows 87% of customers believe companies need to put more effort into providing a seamless experience. When your in-app guide looks completely different on mobile versus desktop, it creates frustration. Discover more insights about why consistency in customer onboarding matters and how it impacts user trust.
By designing a flow that is both personal and scalable, you create an onboarding machine that not only keeps customers around but turns them into confident users who get the value of your product from day one.
Implementing Automation and Interactive Guides
A well-designed onboarding flow on paper is one thing. Bringing it to life with smart technology is another.
This is where you move from theory to execution. You'll use automation and interactive content to deliver a seamless, supportive experience at scale. The goal? Provide timely, relevant guidance right when users need it—without your support team having to do everything manually.
Smart automation isn't about spamming users with generic emails. It’s about creating intelligent, behavior-driven communication that feels personal and helpful. When a user completes a key action, you celebrate it. When they get stuck, you offer a hand. This proactive approach shows you're paying attention.
This is the opposite of a high-touch, manual process that quickly becomes a bottleneck. By letting technology handle the repetitive tasks, your team can focus on higher-value interactions, like strategic check-ins or solving complex issues.
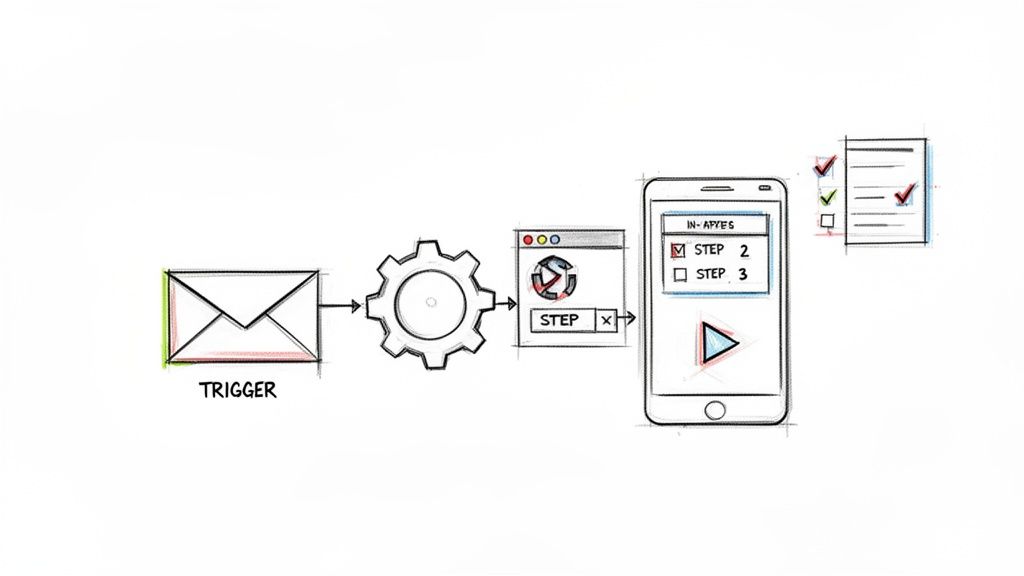
Setting Up Behavior-Driven Automation
The best automation is triggered by what users do (or don't do) inside your product.
This ensures every message is perfectly timed and relevant. Forget the one-size-fits-all email sequence that sends the same content to everyone on day three. That's old news.
Instead, build workflows based on specific events:
Action Completed: A user successfully connects their calendar. Trigger an email congratulating them and suggesting the next logical step, like setting up their first appointment type.
Feature Ignored: A user has been active for a week but hasn't touched a core feature. Send a friendly nudge with a link to a quick tutorial explaining its value.
Signs of Struggle: The system sees a user repeatedly failing to complete a specific task. Automatically create a support ticket or send an email offering help from a customer success manager.
This approach turns your communication from a monologue into a real conversation, making users feel supported every step of the way.
The Power of Interactive, In-App Guidance
Static help articles and long videos have their place, but they often force users to leave your app and break their workflow. The best way to improve your customer onboarding is to provide support directly within your product.
This is where interactive guides are a game-changer.
Instead of just telling users how to do something, you can show them with on-screen, step-by-step instructions they follow in real time. For a platform like Build a Guide, this is the whole point. You can turn a simple screen recording into a polished, interactive tutorial that users can launch whenever they need it.
By embedding guidance directly into your UI, you empower users to self-serve and find answers instantly. This dramatically reduces resolution time and lightens the load on your support team.
This shift from passive documentation to active guidance is fundamental. It meets users where they are and caters to how people actually learn—by doing.
Mini-Playbook for Creating Effective Guides
Making a great interactive guide is more than just hitting "record." To make sure your guides are clear, helpful, and drive action, follow this simple playbook. It's the same process we use to help our clients succeed.
1. Define the Single Outcome Before you record anything, be crystal clear about the one thing you want the user to achieve. Is it connecting an integration? Creating their first report? Every step should serve this single goal.
2. Record the "Happy Path" Record your screen as you walk through the ideal workflow. Talk through your actions out loud to keep the steps clear in your head. Don't worry about mistakes; you can edit them later. The key is to capture the core process smoothly.
3. Add Annotations and Checklists This is where the magic happens. Use an editor to add clear annotations, callouts, and highlights to your screenshots. Break the process down into distinct, actionable steps. For longer workflows, checklists give users a sense of accomplishment.
4. Publish and Embed Once your guide is ready, don't bury it in a forgotten corner of your help center. Embed it directly in your app with a tooltip or help icon right next to the relevant feature. For a deeper dive, check out our article on how to create a step-by-step guide that users will actually love.
By combining smart automation with on-demand interactive support, you build a powerful, scalable system that guides every single user to success.
Measuring Success and Continuously Optimizing Your Process
A great onboarding process is never finished. It’s a living part of your product.
The moment you treat it as a "set it and forget it" project is the moment it starts to fail quietly. It has to evolve with your customers, your product, and your business. Without that, you're just flying blind.
The only way to keep your onboarding sharp is to build a tight feedback loop fueled by data. This means moving past gut feelings and vanity metrics. You need to focus on the key performance indicators (KPIs) that actually signal whether a new customer is on the path to success or quietly churning.
This cycle—measure, analyze, refine, repeat—is what separates a decent onboarding flow from a world-class growth engine.
Defining the Onboarding Metrics That Matter
To actually improve your process, you have to track the right data. It's easy to get lost in metrics that look good in a report but don't correlate with customer success at all. Let's cut through the noise.
Here are the essential KPIs to build your dashboard around:
Completion Rates: This is the most basic, non-negotiable metric. What percentage of new users actually finish your key onboarding milestones? A low completion rate on a setup checklist or initial tutorial is a massive red flag. It screams friction, confusion, or a total lack of motivation.
Time-to-First-Value (TTFV): We've talked about this before, but it's critical. How quickly does a new user get their first real win? A shorter TTFV is one of the strongest predictors of long-term retention you'll ever find. Figure out what your most successful users do first, and find a way to get everyone there faster.
Feature Adoption Rate: Which features are new users actually touching in their first few weeks? If a core feature—one you know leads to stickiness—is being ignored, your onboarding isn't doing its job of showing why it matters.
Customer Churn Rate (First 30-90 Days): Don't just look at overall churn. Isolate it for the initial onboarding window. A high churn rate in the first month points directly to a failure in setting up new users for success. Period.
These metrics give you the full story, combining user behavior with real business outcomes. They tell you if you're creating confident, successful customers or just confusing them.
Using Analytics to Pinpoint Friction and Success
With your key metrics defined, the real work begins: digging into the "why" behind the numbers. This is where you connect analytics with actual user feedback.
Your goal is to find the exact moments where users are either hitting a wall or having that "aha!" moment.
For example, if you see a huge drop-off after a specific step in your interactive guide, that’s your cue. Don't guess what's wrong. Use a tool like FullStory or Hotjar to watch session recordings of users at that step. Are the instructions unclear? Is there a bug? Are they just getting distracted?
On the flip side, look for patterns among your power users. What do they do immediately after signing up? Which features do they adopt first? These insights are goldmines. They show you the "happy path" you should be guiding all new users toward.
A data-driven approach transforms optimization from a guessing game into a scientific process. Every change you make should be a hypothesis designed to improve a specific metric. This lets you systematically build a better onboarding experience over time.
This continuous loop is the core of any strategy that actually works.
Onboarding Metrics Tracking Template
To get you started, here’s a simple template for defining and tracking your core onboarding KPIs. Don't just fill it out once; make it a living document your team reviews regularly.
Metric | Definition | How to Measure | Target Benchmark |
|---|---|---|---|
Completion Rate | The percentage of users who finish the core onboarding checklist. | (Completed Checklists / New Users) * 100 | Increase by 15% quarter-over-quarter. |
Time-to-First-Value | The average time it takes for a user to send their first guide. | Average time (in hours or days) from signup to first guide share. | Reduce by 20% within the next 90 days. |
Feature Adoption | The percentage of new users who use the "Custom Branding" feature. | (Users Using Feature / New Users) * 100 | Achieve 40% adoption in the first 30 days. |
30-Day Churn Rate | The percentage of new users who cancel their subscription in the first month. | (Users Who Churned / Total New Users) * 100 | Keep below 5% for all new cohorts. |
By committing to this cycle of measurement and refinement, you ensure your onboarding doesn't just launch customers—it launches them into long-term success with your product.
Turning Onboarding Into Your Growth Engine
Improving customer onboarding isn't a massive, one-time overhaul. It’s an ongoing commitment to guiding new users from their first login to their first meaningful win—as fast as humanly possible.
This is where retention is won or lost.
The journey starts with a deep audit of your current flow to find the hidden points of friction. From there, you can design a scalable, personalized path that speaks to different user needs, using automation and interactive guides to deliver support right where it’s needed.
This framework turns onboarding from a cost center into your most powerful growth engine.
Think of this not just as improving a process, but as making a direct investment in customer loyalty and lifetime value. A world-class onboarding experience is the foundation for turning new signups into lifelong advocates for your brand.
By committing to a cycle of data-driven optimization, you ensure your onboarding consistently delivers value. The real work is never truly done.
But the rewards—higher retention, lower churn, and happier customers—are absolutely worth it. Now’s the time to take that first step and transform your customer's initial experience.
Answering the Tough Questions
Even the best onboarding plan runs into real-world questions. Here are the answers to the ones that come up most often when teams start digging in.
How Long Should Onboarding Take?
Everyone asks this, but it’s the wrong question. There's no magic number.
Instead of focusing on time, focus on Time-to-First-Value (TTFV). The only thing that matters is how fast you can get a new customer to their "aha!" moment—that first big win they signed up for.
For a simple app, that might be five minutes. For a complex enterprise platform, it could be a week of guided sessions.
The better question is, "Where are people getting stuck?" Let your metrics tell you if the process is too long. If you see a massive drop-off on step three of your setup wizard, it doesn't matter if it only takes 60 seconds. It’s too long or too confusing right there.
What's the Single Most Important Onboarding Metric?
If I had to pick just one, it would be TTFV. No contest.
It’s the most direct measure of whether you’re delivering on your promise, and quickly. A fast TTFV has a massive impact on retention and churn because it proves to the customer, right away, that your product is worth their time.
Honestly, every other metric—completion rates, feature adoption, engagement scores—is just a supporting actor. They all feed into shrinking that time-to-value. Get that right, and the rest tends to follow.
How Do I Personalize Onboarding Without Drowning in Manual Work?
This is where smart segmentation and automation come in. You don't need a unique onboarding flow for every single user. That's a recipe for disaster.
Instead, zero in on your top two or three user personas or the primary jobs people hire your product to do.
Start with a core onboarding flow that covers the essentials for everyone. Then, use simple triggers to layer in personalized touches for each key segment.
Ask for their role during sign-up: Are they an Admin, a Manager, or an end-user?
Trigger role-based in-app tours: An Admin’s first tour should point straight to user management settings.
Send targeted email tips: A Manager might get a follow-up email a few days later showcasing reporting features.
This strategy gives you the best of both worlds. You deliver a tailored experience that feels personal and guides users to what they care about, all without burying your team in one-off tasks.
Stop wasting time on manual documentation. With Build a Guide, you can turn any screen recording into a polished, interactive SOP in minutes. See how our platform helps you create beautiful, scalable guides that slash support tickets and accelerate customer success. Start building better guides today.